Last Updated on September 6, 2023 by Tim Wells
Every time I stumble upon my old GameCube games, I get flashbacks of late nights in college playing Need for Speed when we should have been studying.
I’ll bet you’ve had a similar experience at least once.
Classic game consoles are becoming more expensive as time goes on, making those games harder to play. Often, when they break, there’s nobody left that can fix them.
Is there any way to play your old games, then?
Yes!
Dolphin is a Nintendo emulator that works on Windows, Mac, Android – even Android TV devices like the NVIDIA Shield.
If you haven’t heard of emulators before, here’s a brief overview.
Emulators are software that enables your new device (PC, NVIDIA Shield, etc.) to understand the old game console’s programs.
Dolphin is easy to install on your NVIDIA Shield or Android TV. Still, it takes a little work to get all emulator settings correctly dialed in.
In this article, I will guide you through installing Dolphin on an NVIDIA Shield. Then I’ll take you through the settings I use to get the best performance.
Finally, I’m going to show you how to add your GameCube games to the Dolphin emulator so you can start having fun.
Let’s get started.
How to Install or Update Dolphin Emulator on Android TV
There are two ways to install the Dolphin Emulator on Android TV. The easiest way is directly through the Google Play Store, so that’s the method I will detail below.
Where to Download Dolphin
In 2016, Dolphin pulled their emulator from the Play Store because it had compatibility issues with Android. It re-emerged in 2018 and has been there ever since.
So if you can’t find it on the Google Play Store or want to try a specific version, you can always find it on their official download page. You’ll then be able to sideload the APK on your Android device like normal.
Installing Dolphin from the Google Play Store
Installing Dolphin on your NVIDIA Shield is straightforward since you can find it on the Google Play Store. But I’ll cover it briefly here anyway.
Inside the Play Store, click on the magnifying glass icon in the top row.
In the Search Bar, you can search for ‘Dolphin’, or simply ‘Emulator’ as I did in this image.
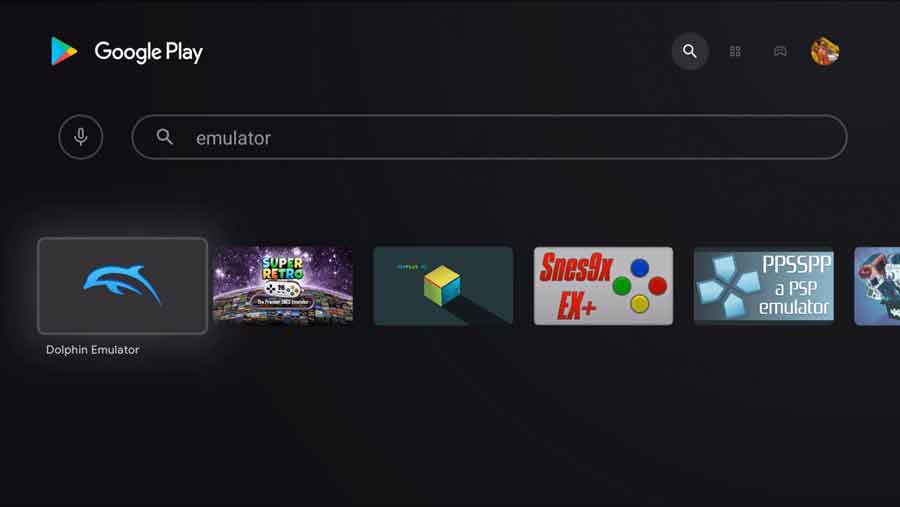
Either way, you should get the same result.
Click on the Dolphin Emulator icon to see more details.
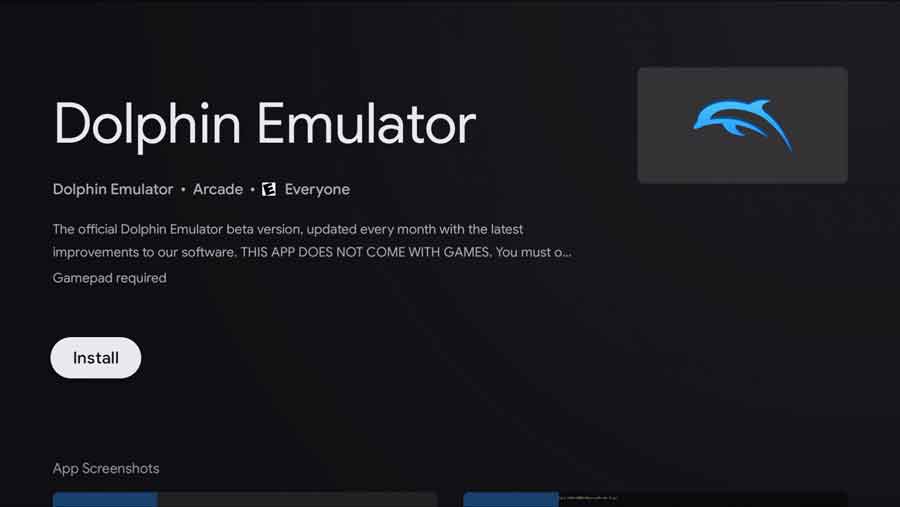
From here, click the Install button to start the installation process.
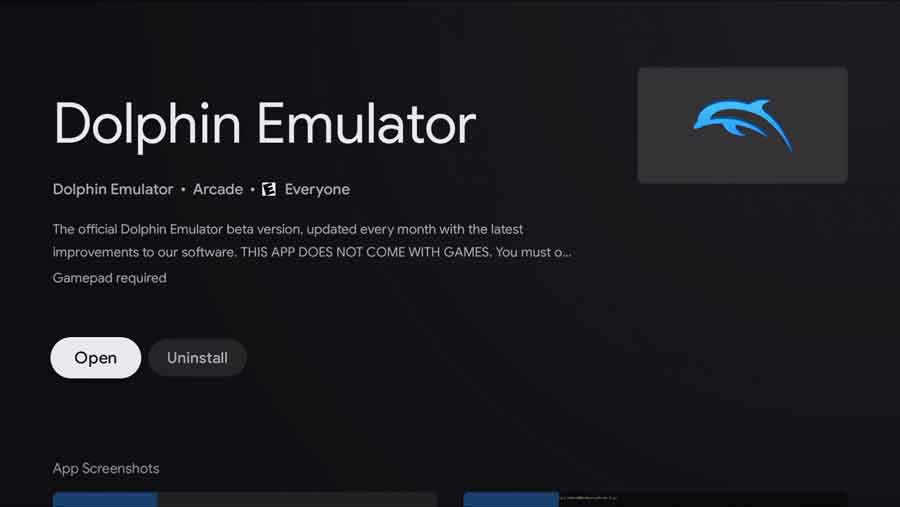
Once the installation finishes, you can open it directly from the Google Play Store. Or you can head back to your Apps page and find an icon there as well.
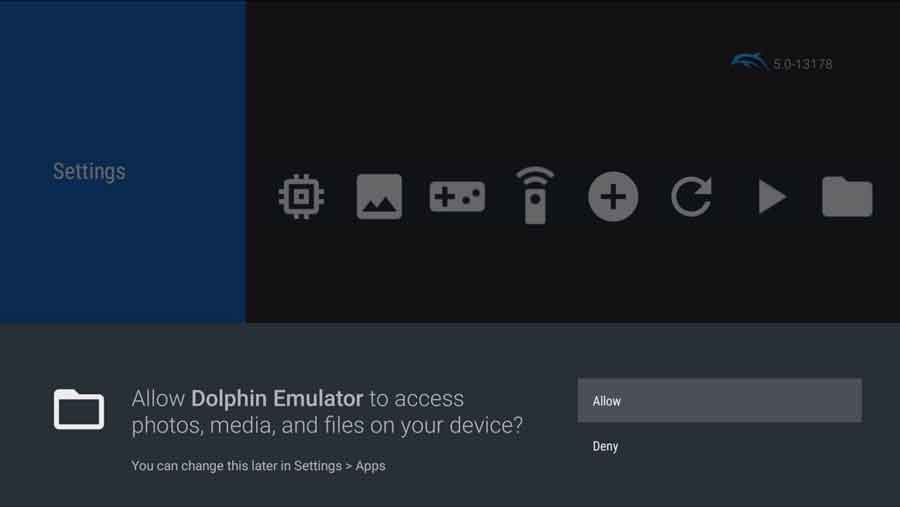
The first time you launch the Dolphin Emulator, you’ll be asked to allow it access to your photos, media, and files. Since you’ll be storing your Nintendo ROMs on your Android TV, it needs this to work correctly.
And that’s it. Pretty easy, eh?
Let’s take a look at the interface.
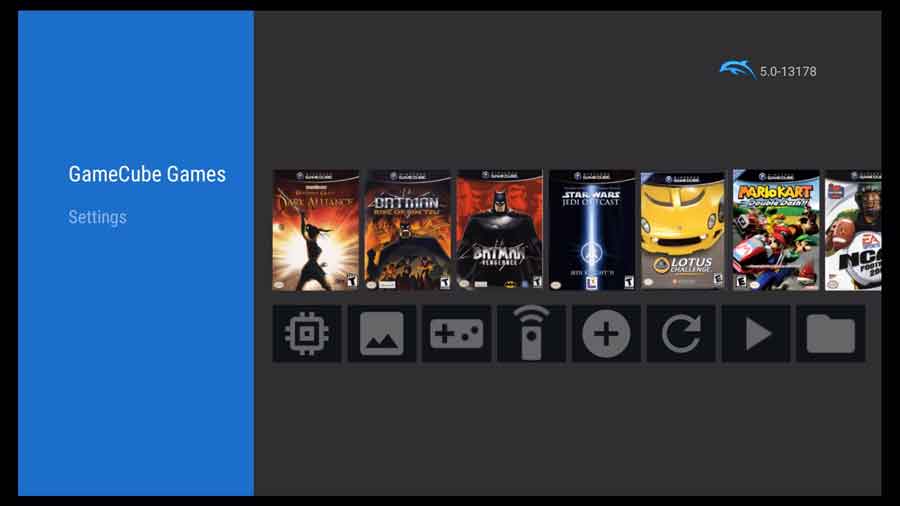
A Tour of the Dolphin Emulator on NVIDIA Shield
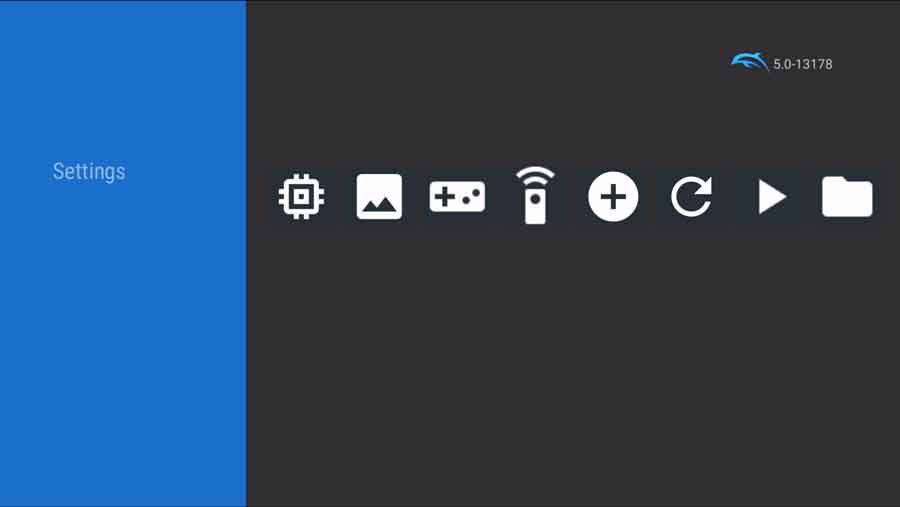
When you first install Dolphin, there’s not much to it.
But don’t worry. This screen will have more to it as soon as we start installing some games.
First, let’s take a look at the menu system.
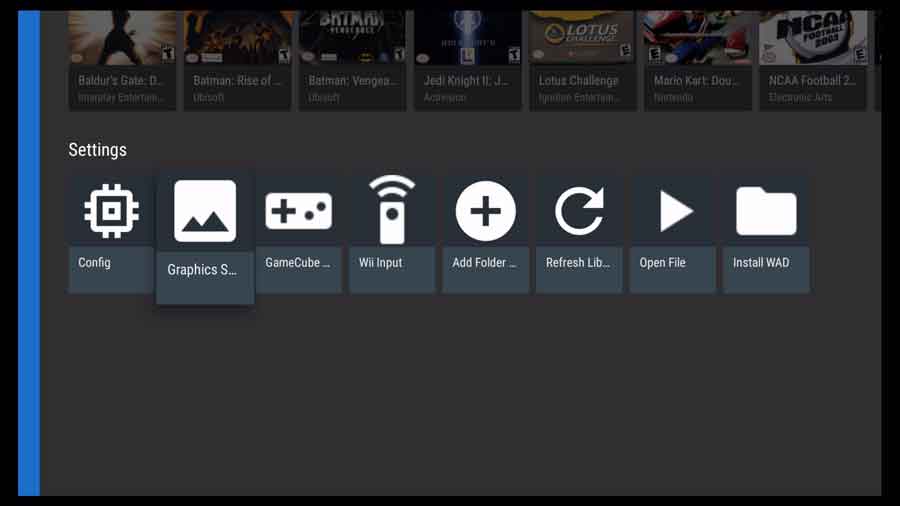
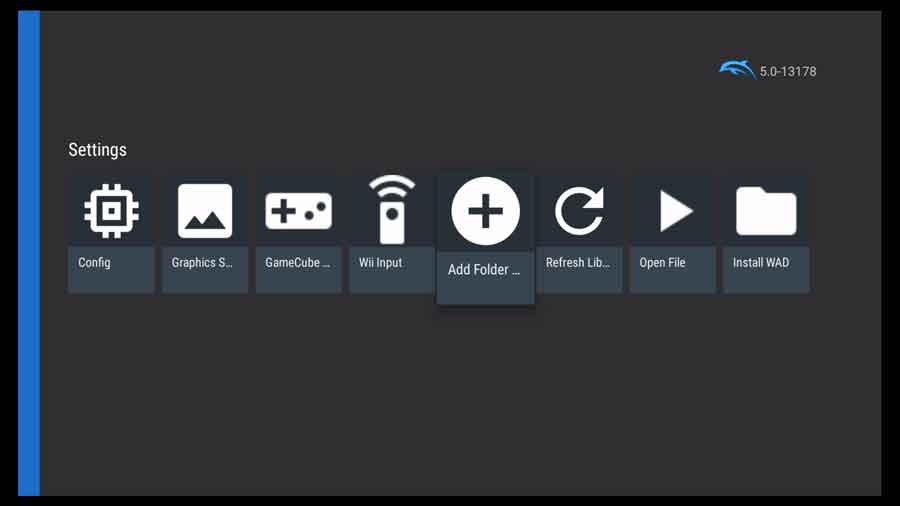
Right now, the only option is Settings.

The Settings menu is broken down into several different options.
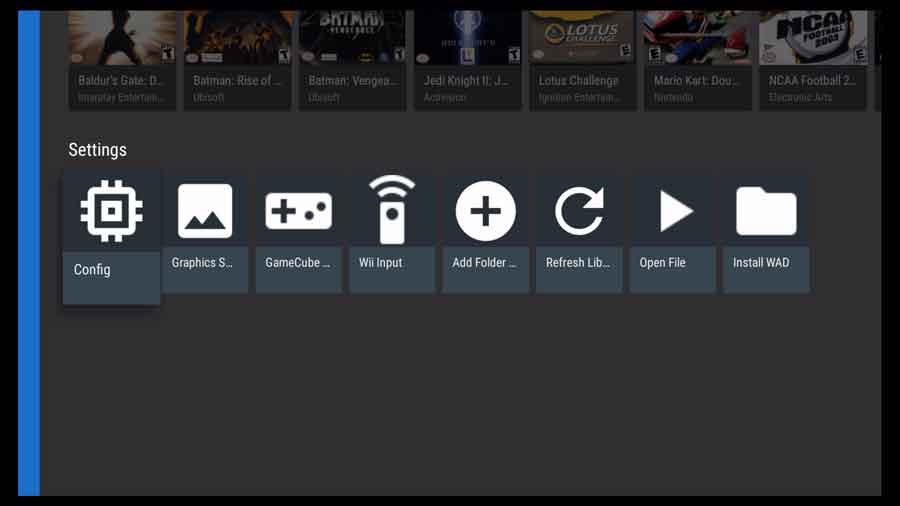
We’ll spend a lot of time on the Config and Graphics Settings menus in the next section, so let’s touch on the other options first.
Install WAD: WiiWare was a service that allowed Wii owners to download and install games directly from Nintendo. These were commonly distributed as .wad files.
If you saved your WiiWare downloads and have been wondering what to do with them, you can install them directly in Dolphin Emulator using this option.
Open File: This can be useful when initially setting up your game library. However, you’ll usually go directly to the system’s channel menu to launch games.
Refresh Library: This forces a manual rescan of your library folders to search for new games. In most cases, this shouldn’t be necessary, but it’s nice to have the functionality.

Add Folder: Here’s where you tell Dolphin where your games are stored. We’ll cover this in more detail in the section How to Add Games to Dolphin Emulator below.
Wii Input: Global controller configuration for all Wii games.
GameCube Input: Global controller configuration for all GameCube games.
You will spend most of your time in the Config and Graphics Settings menus, so let’s go through those in more detail now.
I will also share the settings I used to get the best performance from Dolphin Emulator on my NVIDIA Shield TV.
Best Dolphin Emulator Settings For The NVIDIA Shield
I want to set some realistic expectations before we go any further.
Any emulator, Dolphin included, is not something that works great right out of the box. I had to do a lot of tweaking and testing to get it running well on my NVIDIA Shield.
Some settings that work well on your Android smartphone hurt the NVIDIA Shield performance.
I suggest using my recommended settings as a starting point but then testing each setting one at a time. For example, you may get better performance using OpenGL instead of Vulkan.
But if you change your Video Backend along with five other settings, it’s hard to see whether that made an improvement.
Config Settings Menu
The Config menu holds any settings for the CPU, audio, file paths, the emulator’s menu system, and any settings exclusive to the GameCube or Wii.
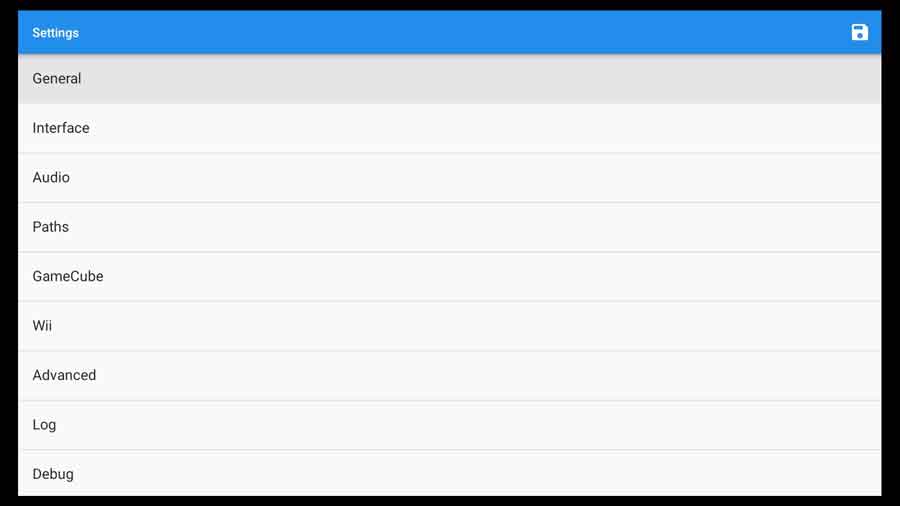
General Settings
Under General Settings, we’re only going to make a few changes.
Dual Core [Enabled]: Turn this on. The Tegra CPU in the NVIDIA Shield is a powerhouse, so you definitely want to take advantage of that.
On slower Android TV devices, keep this unchecked. However, there’s no need to do that on the Shield TV.
Allow Mismatched Region Settings [Disabled]: This setting allows you to make the game language different from the game’s region code. For example, you could have a Japanese game but display it in English. I have no need to enable this, so I leave it unchecked.

Change Discs Automatically [Disabled]: Only about two dozen Nintendo games have spanned two physical discs. You should turn this on if you own any of the ones on that list. Otherwise, leave it unchecked.
Speed Limit (0% = Unlimited) [100%]: This setting lets you change the CPU speed. In theory, this sounds great. However, my testing made the game look like it was stuck in fast-forward.
We’ll be changing the GPU speed on a different screen. Leave this set to 100%.
Enable Usage Statistics Reporting [Enabled]: This allows the Dolphin emulator to collect anonymous data on how you use the system. I’m OK with them doing this since this is an open-source, passion project for the developers.
Generate a New Statistics Identity: If you have usage statistics enabled, this will wipe the data that’s being collected and start collecting it under a new ID.
Enable Savestates [Disabled]: Enabling this setting will allow you to create saves in places where the game wouldn’t usually allow it. Some may call that…cheating.
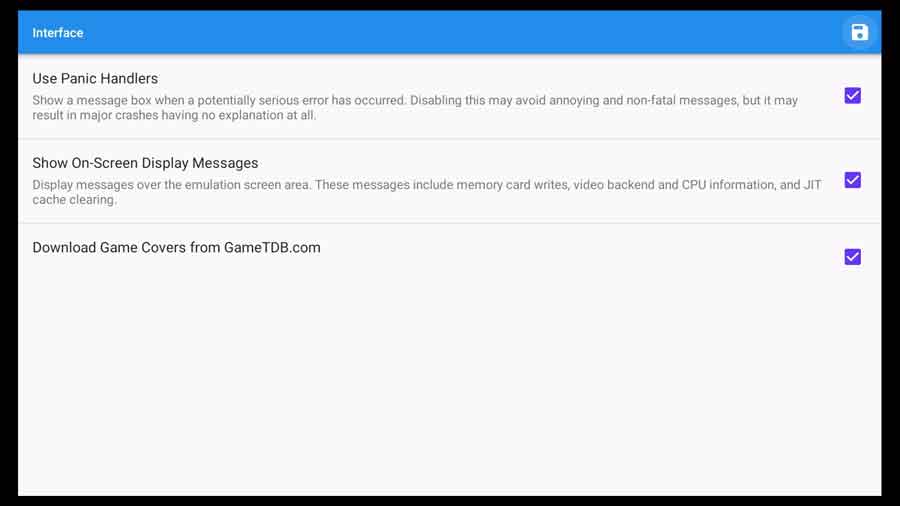
Interface Settings
Use Panic Handlers [Enabled]: This has no impact on performance, but it’s helpful to know exactly why the game crashed in a particular area. I leave this enabled.
Show On-Screen Display Messages [Enabled]: This enables messages that tell you how the Dolphin emulator interacts with the NVIDIA Shield’s file system. These are “blink, and you’ll miss them” messages that don’t detract from the game experience. I leave this enabled.
Download Game Covers from GameTDB.com [Enabled]: Leave this enabled unless you really want to do this yourself.
Audio Settings
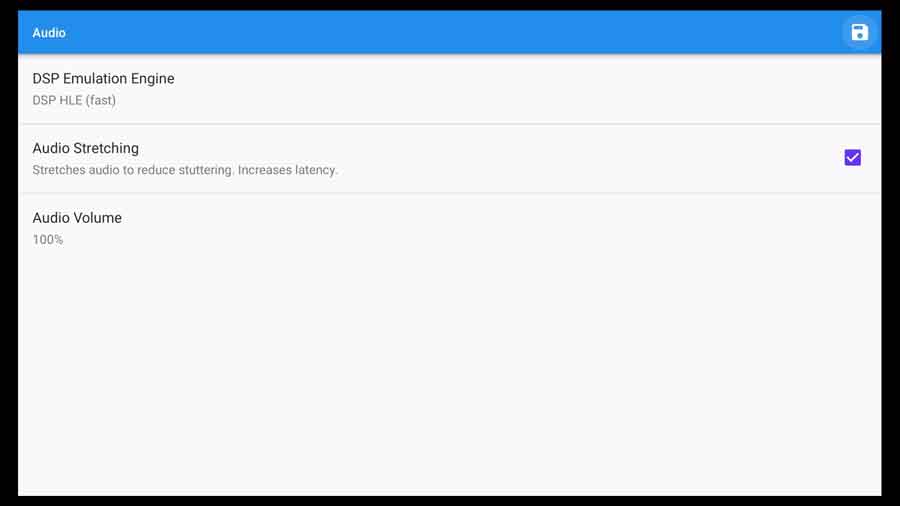
DSP Emulation Engine [DSP HLE (fast)]: According to the Dolphin Wiki, the DSP is a Digital Signal Processor to perform special audio processing. This is usually 3D spatial calculations on games that support it.
I leave this set to DSP HLE (fast). HLE stands for High-Level Emulation, and I have yet to find any games where I need to switch to the LLE (Low-Level Emulator) setting.
In most cases, this works great, with only minor glitches.
Audio Stretching [Enabled]: This is a controversial setting, but I love it. Audio Stretching increases latency, and I can’t tell you it isn’t noticeable. There’s as much as a second difference in the dialog in some cases.
However, the tradeoff is that the sound overall – and the game itself – is light-years smoother than it is otherwise.
I’ve had great experiences enabling Audio Stretching, so I recommend turning it on.
Audio Volume [100%]: Some users will turn the game’s volume completely off using this setting. Since I haven’t needed to with any of my games, I recommend leaving this at 100% volume.
Advanced Settings
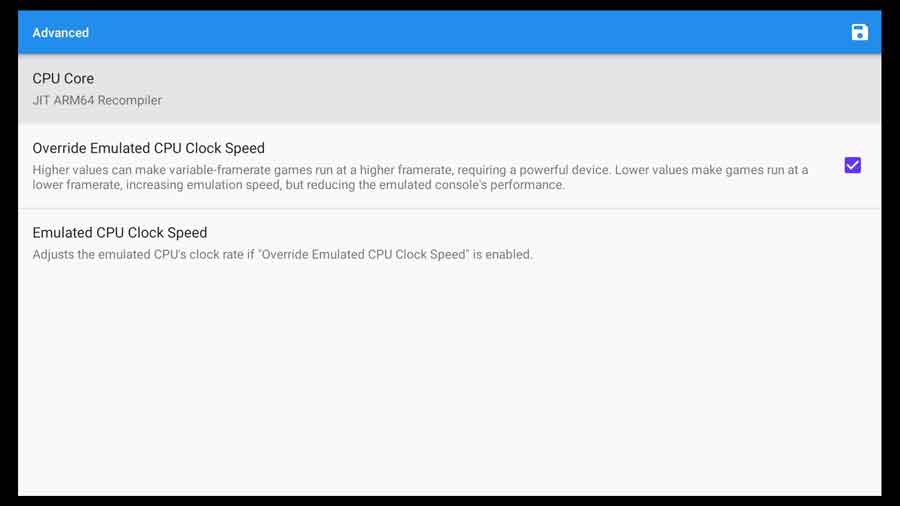
CPU Core [JIT ARM64 Recompiler]: The only real choice here is the JIT ARM64 Recompiler.
Let’s dissect that to get a picture of what it means.
Hopefully, you’re familiar with what an ARM processor is. Most Android-based devices will use a CPU based on the ARM architecture, and the NVIDIA Shield is no different.
ARM64 is a 64-bit version rather than a 32-bit version.
A JIT recompiler means that the CPU translates the source code into machine language at run-time, or…Just In Time for when it needs it. (source)
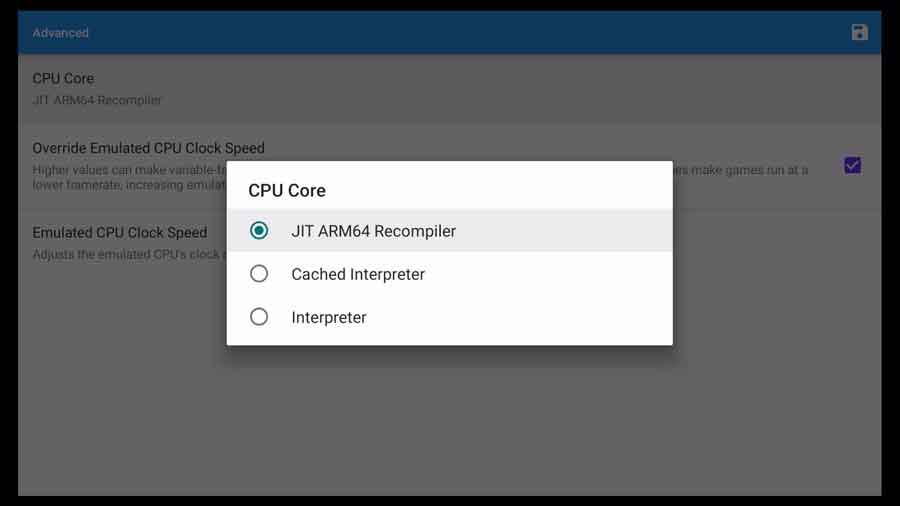
Interpreters are much, much slower than the JIT recompiler. A Cached Interpreter is slightly faster, but you still take a massive performance hit.
To be honest, if you can’t run Dolphin Emulator on the JIT ARM64 Recompiler, it’s not worth running on your Android TV device.
Override Emulated CPU Clock Speed [Enabled]: This enables the next setting we will discuss. They go hand-in-hand.
Emulated CPU Clock Speed [100%]: This is a slider where you can tell the Dolphin Emulator to simulate that the NVIDIA Shield’s CPU is running faster or slower than it usually would.
Numbers over 100% will increase the framerate but necessitate a very powerful device. Numbers lower than 100% will lower the framerate, which, in turn, makes the emulator faster.
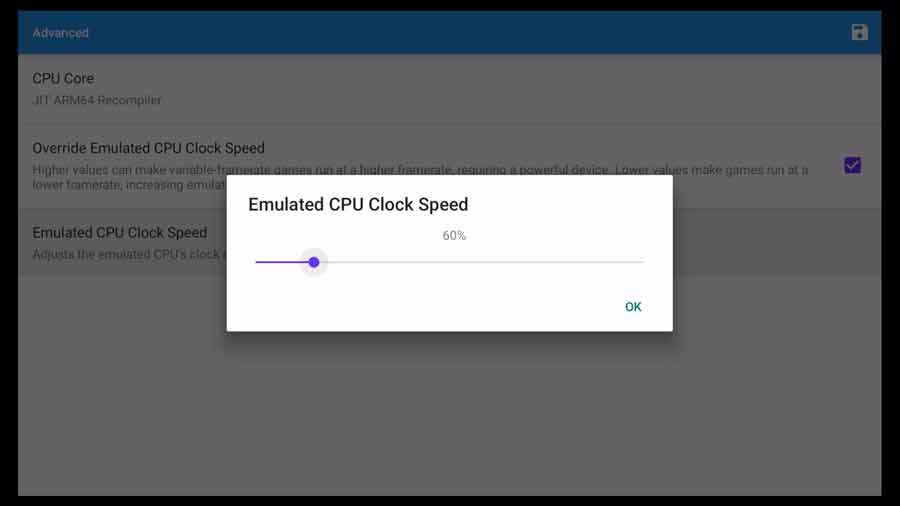
This setting will depend heavily on the games you want to run. Most users say a value between 60% and 80% will work.
I got the best performance from my NVIDIA Shield, set to 60%.
Graphics Settings Menu
The Graphics Settings menu lets you tweak everything to do with how your NVIDIA Shield’s GPU renders the game.
You can change the graphics engine, screen resolution, color depth, configure shading, and more.
In my experience, small changes in the Graphics Settings menu can have a huge effect on game performance.
General Graphics Settings

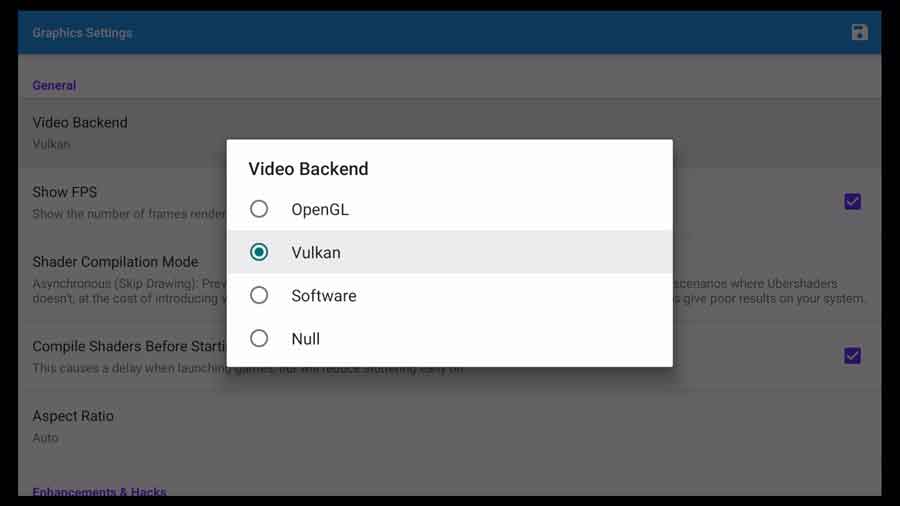
Video Backend [Vulkan]: Most Android devices should set this to OpenGL. It just performs better.
However, Vulkan performs much better on the NVIDIA Shield.
I was amazed at the difference it made when switching back and forth between the two. Games that were smooth when using Vulkan were completely unplayable when I switched to OpenGL.
If you have an NVIDIA Shield TV, make sure you use the Vulkan backend. It makes all the difference in the world.
Show FPS: This is a great feature, especially if you’re testing different settings to see how they affect your gameplay.
FPS stands for Frames Per Second. Most games run at around 60 frames per second on their native game consoles. As you put more load on the system, that number will drop substantially.
I keep this setting enabled all the time. It provides me instant feedback about what’s going on with the emulator, and it only takes up a little space in the upper corner of the screen.
Shader Compilation Mode [Synchronous]: Here’s another setting you’ll need to test out on individual games to see which works best for you.
The default setting is Synchronous. I have yet to find any of my games that don’t work with that setting.
However, there are some more challenging games, like Metroid Prime, where synchronous shader compilation will make it stutter and die.
That’s why Dolphin came up with two Ubershaders modes.
Once you have your emulator settings dialed in and they work for most of your games, try changing this setting if you encounter problems.
The upgrade path is from Synchronous (default) to Synchronous (Ubershaders), then to Asynchronous (Ubershaders) before finally going to Asynchronous (Skip Drawing).
Compile Shaders Before Starting [Enabled]: The tradeoff with this setting is that it will cause the game to load a bit slower but will reduce any early graphics stuttering.
I enable this setting.
Aspect Ratio [Auto]: Back when these game systems were out, you could buy televisions in either widescreen (16:9 ratio) or standard (4:3 ratio). Some game systems could switch back and forth, depending on the game.
This is a personal preference setting. I’m OK with a 4:3 aspect ratio, even though it means I will see black bars on the sides of my screen.
To some people, that really annoys them.
I leave this set to Auto, but feel free to change it. It will not affect performance.
Enhancements
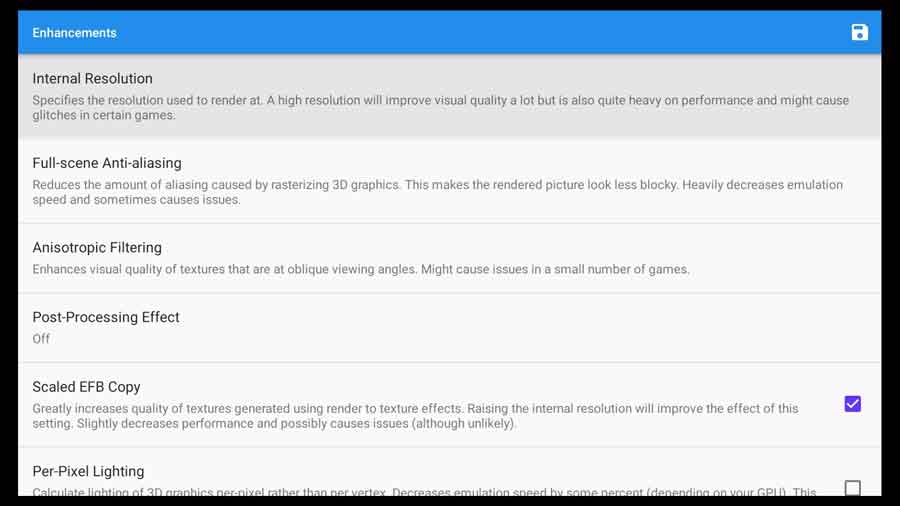
As the name suggests, the Enhancements section is where you’ll find most of the settings to make your games look better on Dolphin Emulator on the NVIDIA Shield.
The Shield has a lot of processing power, so expect to be tweaking these settings frequently.
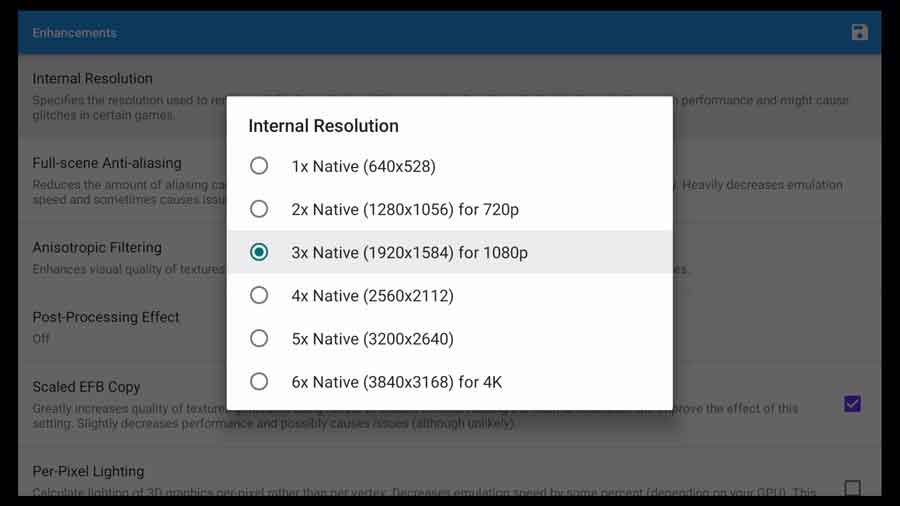
Internal Resolution [3x Native]: This is the resolution Dolphin will render your games. While both the GameCube and the Wii can work with high-definition televisions, the native resolution is only 480p.
Increasing the internal resolution setting will make your games look better. However, keep in mind that there is a tradeoff.
Your NVIDIA Shield has to work harder to render games at higher resolutions, and your framerates will suffer.
I find that the perfect balance is at a 3x Native Resolution, which is enough to render games at 1080p. They look great, and I still can get 60 fps more often than not.
I recommend keeping this at Native Resolution until you have everything else dialed in the way you like it. Then you can slowly increase this until you start seeing a performance impact.
Full-Scene Anti-Aliasing [Off]: Have you ever seen jagged edges on curves in a game? Anti-aliasing works to smooth out those edges, so you get a more natural-looking curve.
Dolphin allows you to configure full-scene anti-aliasing at 2x, 4x, or 8x normal, or to turn it off entirely.
Unfortunately, anti-aliasing is extremely processor-intense. I recommend increasing your native resolution rather than enabling full-scene anti-aliasing.

Anisotropic Filtering [1x]: Dolphin’s explanation is pretty vague, so I had to dig to figure out precisely what this meant.
Imagine you’re looking at a single square floating in the air in front of you. The GPU (your eyes) can draw that square very quickly because it’s simple. Four lines at right angles to each other.
No problem.
Imagine taking a step to your right so you’re not directly in line with it anymore. Suddenly the square doesn’t look like a square. The angles are all off.
When that happens, your eyes (the GPU) have a harder time identifying the shape.
Anisotropic filtering enhances the quality of items at oblique angles, so the GPU can render them better. Dolphin gives you a few different options here as well.
You can select between 1x, 2x, 4x, 8x and 16x anisotropic filtering.
The higher you go, the more of a performance impact you’ll see overall, so I leave this at 1x.
Post-Processing Effect [Off]: Post-Processing Effects are akin to Instagram Filters. They look cute…the first time. After that, they feel like a gimmick.
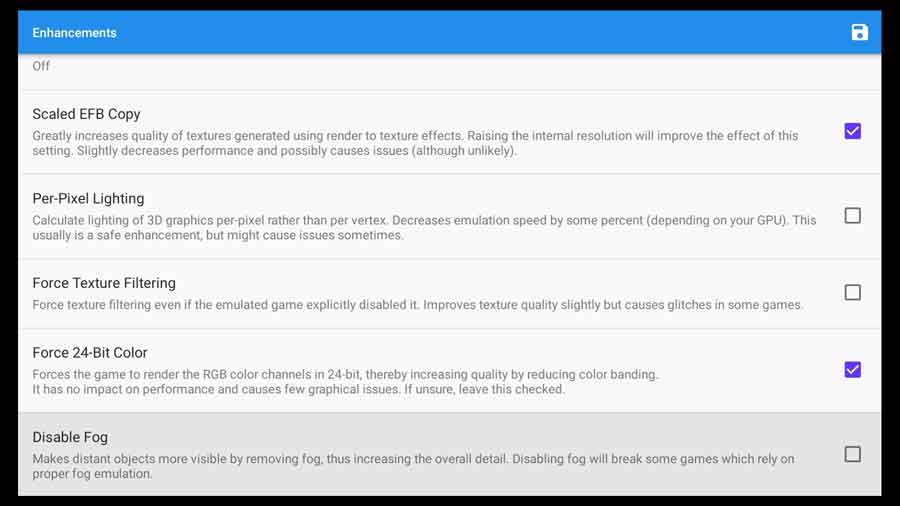
Scaled EFB Copy [Enabled]: Usually, the first thing I notice when I’m playing a game is the textures. You can breathe new life into old games by improving the models’ textures.
Enabling this setting will result in a minor performance hit, but it’s definitely worth it.
Per-Pixel Lighting [Disabled]: By contrast, I’ve never cared too much about lighting. When NVIDIA releases a new graphics card, we all ‘ooooh’ and ‘ahhhh’ at the realistic lighting effects.
But lighting effects are one of the first things I disable to get extra performance out of my device.
Enable if you’ve maxed out your resolution and are still getting 60 fps. Otherwise, leave it disabled.
Force Texture Filtering [Disabled]: Texture filtering smooths out the colors of adjacent pixels so it appears like a gradual blending to our eyes. Many games have this enabled by default; however, some do not. Enabling this setting will force those games to use it.
Because it’s trying to force the game to do something it wasn’t designed to, I leave this setting disabled.
Force 24-Bit Color [Enabled]: Similarly, this forces the game to use a 24-bit color pallet, which looks smoother to our eyes. Dolphin says this has no impact on performance, so I leave this enabled.
Disable Fog [Disabled]: As much as I would love to enable this, game designers use “fog” for a reason. The farther we can see in the game, the more the GPU has to render, which slows down performance.
Leave this disabled unless you’re running at a very low native resolution.
Disable Copy Filter [Enabled]: Copy Filter is useful at lower resolutions to get a sharper-looking image. As you increase the native resolution, it becomes less and less important.
With my NVIDIA Shield at 3x Native Resolution, I don’t see any difference between having this setting on or off.
Arbitrary Mipmap Detection [Enabled]: I’m not going to lie. I don’t understand this setting, so I’m leaving it at its default setting. From what I can tell from this thread, it has to do with how Dolphin renders textures at a distance.
Widescreen Hack [Disabled]: I don’t need to see everything in widescreen mode, so I leave this disabled.
Enabling it will force Dolphin to output video into a 16:9 widescreen format, even if the game wasn’t designed for it. That may lead to an image that looks stretched.
Backend Multithreading [Disabled]: I haven’t seen any reported instances where this increases performance, especially on the NVIDIA Shield.
I recommend leaving it disabled, which is the default setting.
Hacks
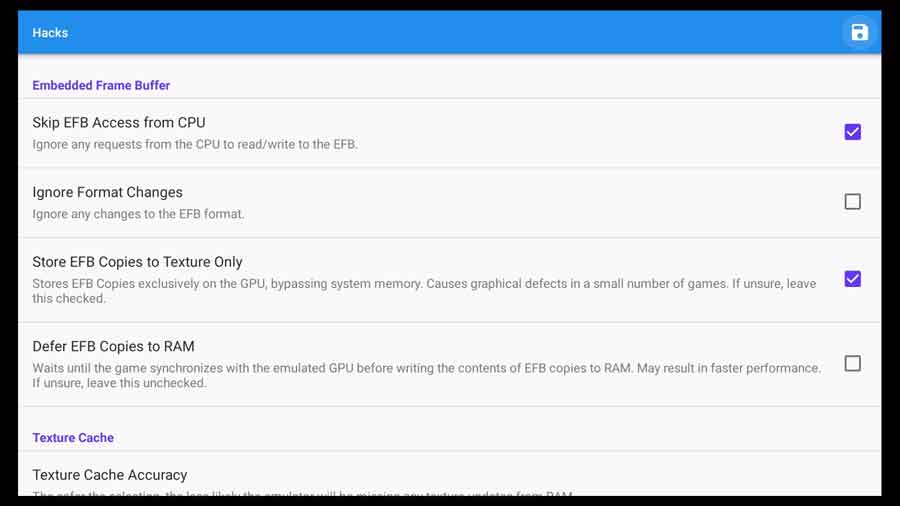
Skip EFB Access from CPU [Enabled – usually]: In most cases, you can leave this checked, providing a slight performance boost.
However, some games require EFB access and will crash without it.
Ignore Format Changes [Disabled]: This setting has to do with the color format. In this thread, one of Dolphin’s developers explained it better than I could ever hope to.
I’ve heard a few games will not run unless this setting is enabled. However, I haven’t run across any, so I’m leaving this at the default setting.
Store EFB Copies to Texture Only [Enabled]: This stores EFB textures to the GPU instead of using system memory. Disabling this has the potential to cause some graphical errors, so I leave it enabled.
Defer EFB Copies to RAM [Disabled]: With this setting disabled, the Dolphin emulator will store EFB copies directly to RAM. This is more or less what the original Nintendo hardware did with EFB copies.
Some games require this to be disabled to work correctly.
Texture Cache Accuracy [Low]: You can set this to Low, Medium, or High. The lower this setting, the higher the performance, but the lower the accuracy of the textures.
Since this is about NVIDIA Shield performance, I leave this set to Low.
GPU Texture Decoding [Enabled]: Enabling this setting lets the GPU decode textures when it can. This is a no-brainer on the NVIDIA Shield.
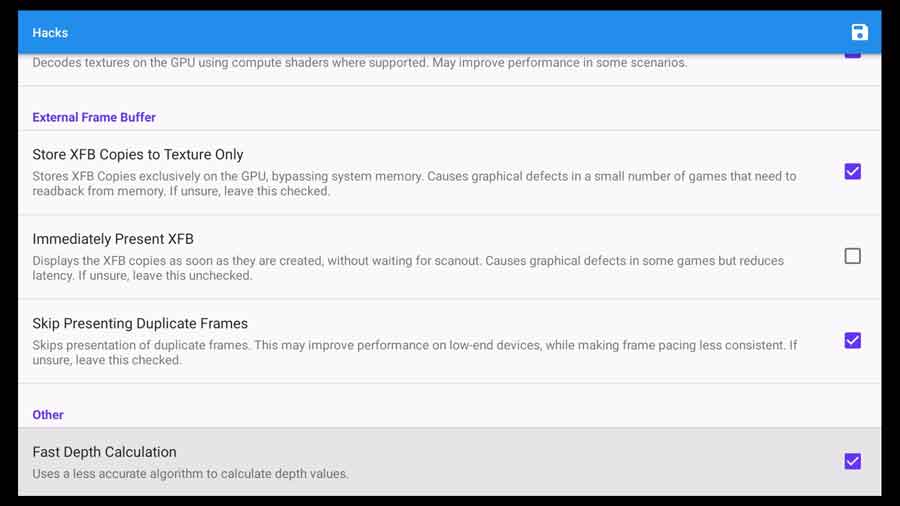
Store External Frame Buffer (XFB) Copies to Texture Only [Enabled]: Enabling this setting will cause the Dolphin Emulator to only store textures on the NVIDIA Shield TV’s GPU.
Here again, we want the GPU to do as much work as possible.
Immediately Present XFB [Disabled]: This has the potential to decrease latency and increase performance. However, it could also cause glitches.
Skip Presenting Duplicate Frames [Enabled]: This was included as a performance hack for low-power devices like smartphones and older PCs.
I leave this enabled because it is an easy way to take some of the pressure off the emulator without making it noticeable from a user’s perspective.
Fast Depth Calculation [Enabled]: This uses a faster but less accurate algorithm to calculate distance.
How to Add Games to Dolphin Emulator on NVIDIA Shield
Now that we’ve got our settings dialed in, it’s time to add some games.
The easiest way is to store all your games on an external hard drive. NVIDIA recently advised against using USB flash drives because they can overheat and damage your Shield TV.
If you’re still using a USB flash drive, check out my article, where I recommend the best external hard drive and micro-SD card for the NVIDIA Shield.
Back on the main menu of the Dolphin Emulator, one of the icons we skipped over was Add Folder. We’re going to click on that now to add some games.
This opens up a file menu where you can tell the Dolphin emulator where your games are stored on your NVIDIA Shield.
I recommend storing all your game files in separate folders for each system. For example, you can have one folder for GameCube and another for the N64.
In my case, I created two folders on my WD Black external hard drive. One for GameCube games and one for N64 games.
Doing this at the folder level automatically searches the folder and adds all of the games it finds, as long as they’re iso files.

If you’ve ripped a music CD before, you’re likely familiar with iso files. They are disk images that most operating systems can access just as if you were popping the disk into a CD-ROM drive.
Once that’s done, click back to the main menu and you should see all of your games.
FAQ
Is Dolphin Emulator Legal?
Yes, Dolphin Emulator is perfectly legal. They created it by reverse engineering their code to run Nintendo games. No proprietary Nintendo code was used when making the emulator.
In the United States, emulating software is legal according to multiple legal precedents (Sega v. Accolade 1992, Sony Computer Entertainment, Inc. v. Connectix Corporation 2000, and Sony Computer Entertainment America v. Bleem 2000).
However, it is NOT legal to download game ROMs from the Internet, and dolphin takes a strong stand against piracy of this sort.
Where Do You Find Games for Dolphin Emulator?
Dolphin is intended to be used with games you have the legal right to use – in other words, games you already own.
The easiest way to get games for Dolphin is to use a software program like CleanRip, RawDump, or friidump to make an iso image of a game you own.
Thankfully, used GameCube games have really come down in price to the point that you can find most games for around $5 on eBay.
In our roundup article, you can read more about the best emulators for the NVIDIA Shield and Android TV!
For more great articles like this, head on over to my NVIDIA Shield TV resource page. All my tips, tricks, reviews, and tutorials will help you get the most out of your NVIDIA Shield.

After a brief hiatus from the industry he's back at the helm of AndroidTVNews.com to bring Android TV and TV boxes to the forefront of the streaming world.
When he's not writing, he spends as much time as he can with his beautiful wife and his bulldog.
- How to set up and use Stremio with Real-Debrid on Android TV [2024] - August 18, 2024
- How to Install Kodi Diggz Xenon Plus & Free99 Build [March 2024] - March 3, 2024
- How to Enable Unknown Sources on Chromecast with Google TV [2025] - October 30, 2023