Last Updated on September 6, 2023 by Tim Wells
One of the most overlooked features of the NVIDIA Shield is connecting to your local network to transfer files to and from your PC.
Think about it. Most people still transfer files by copying to their Shield TV by copying them from their PC to a USB flash drive. It’s a long, tedious process that involves a lot of running back and forth.
Imagine being able to copy them once from your PC directly to your Shield TV.
It’s pretty easy to set up. And in this article, I will walk you through the process.
Note: Mounting network storage on your NVIDIA Shield TV is another excellent option. While we don’t cover that in this article, I have another tutorial dedicated to setting that up.
For more great articles like this, visit my NVIDIA Shield TV resource page. You’ll find all of my tips, tricks, reviews, and tutorials to help you get the most out of your NVIDIA Shield.
How to Connect NVIDIA Shield to PC
The theory behind connecting your NVIDIA Shield to your Windows PC is pretty simple.
The entire process should only take a few minutes. After that, you can access your Shield TV’s internal storage right from your PC.
However, there are some snags that you can hit along the way, so it’s critical to follow along and not skip steps.
I’ve broken this tutorial down into two sections.
In the first section, we will configure your NVIDIA Shield to transfer files over your local network. Then we will jump over to your Windows PC and connect to your Shield TV.
Part 1: Configuring Your NVIDIA Shield TV
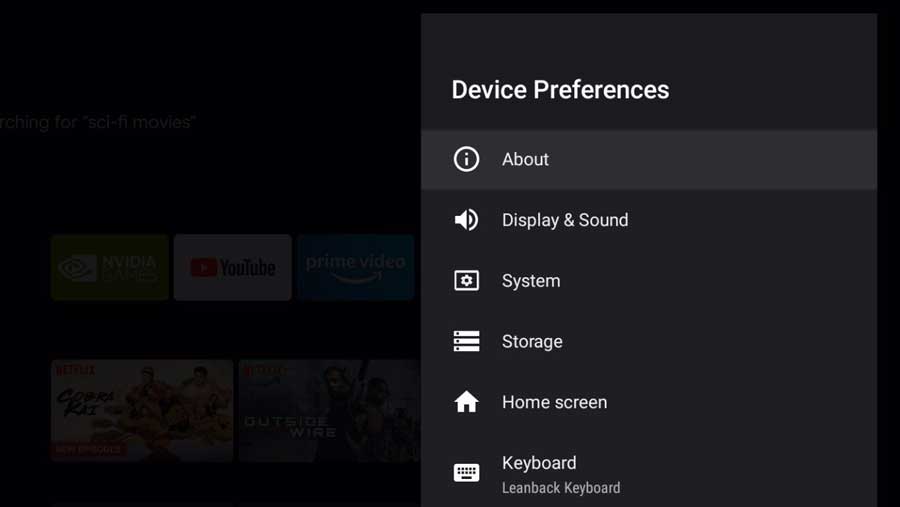
To start, open the Settings menu on your NVIDIA Shield. You can do this by clicking on the gear-shaped icon in the upper right-hand corner of the home screen.
Then click Device Preferences.

Renaming Your NVIDIA Shield
The first thing we’re going to do is rename your Shield TV. If you’ve already done this at some point, you can skip this step.
I recommend renaming your Shield TV to something more descriptive. For example, I have a 2015 Shield, a 2017 Shield Pro, and a 2019 Shield “tube.”
So I use the year as a descriptor to make things easier.
To do this, click on the About entry.
Under Device Name, you can see what your Shield is currently named.
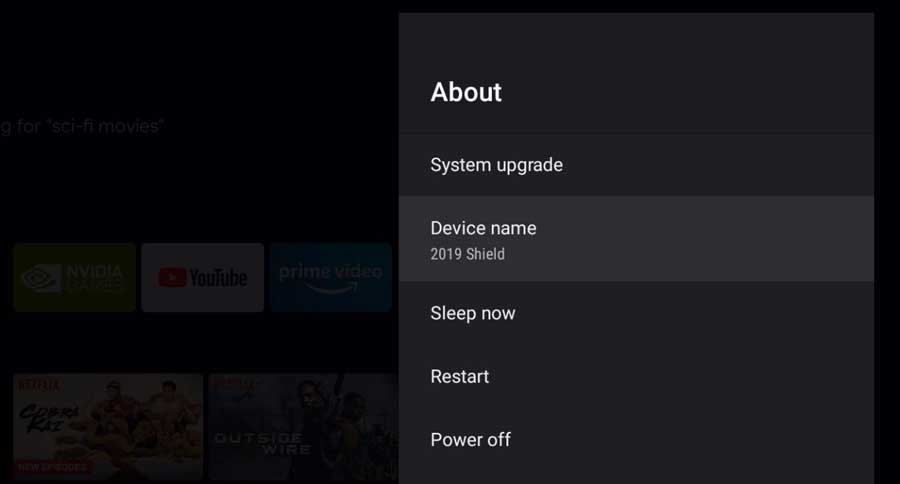
This is what’s going to show up on your Windows PC when you browse your network. That’s why changing it to something that makes sense to you is important.
Click on Device Name and change it on the next screen.
Configuring Network File Transfers
Go back to the Device Preferences tab on the Settings menu.
Then click Storage.
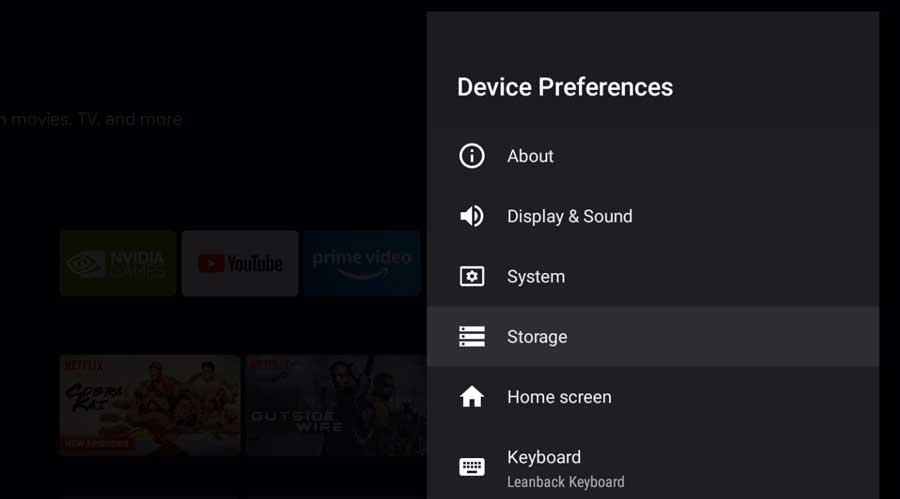
Usually, this section of the Settings menu is where you’ll configure an external hard drive or SD card.
Today, you want to scroll down and enable Transfer Files Over Local Network.
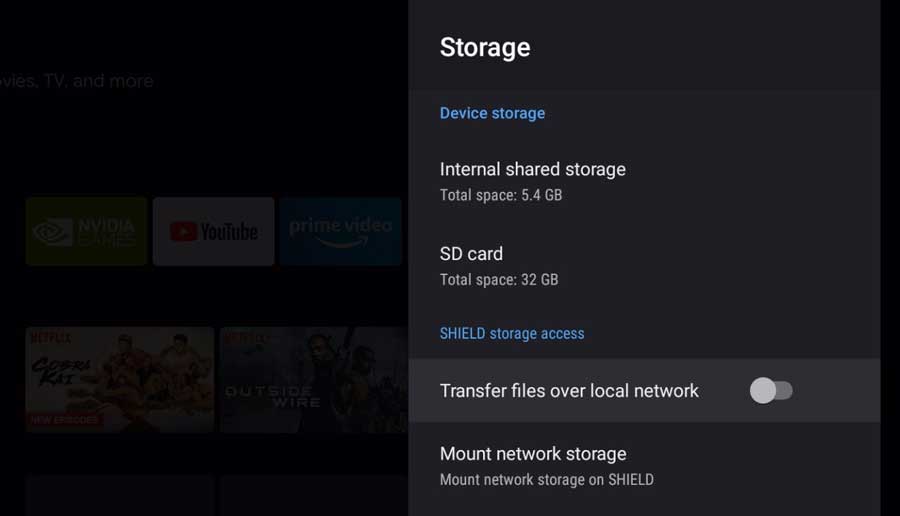
When you click on this, a message gives you more information.
Enabling this setting will provide you a username and password to connect to your NVIDIA Shield through a computer on the same network.
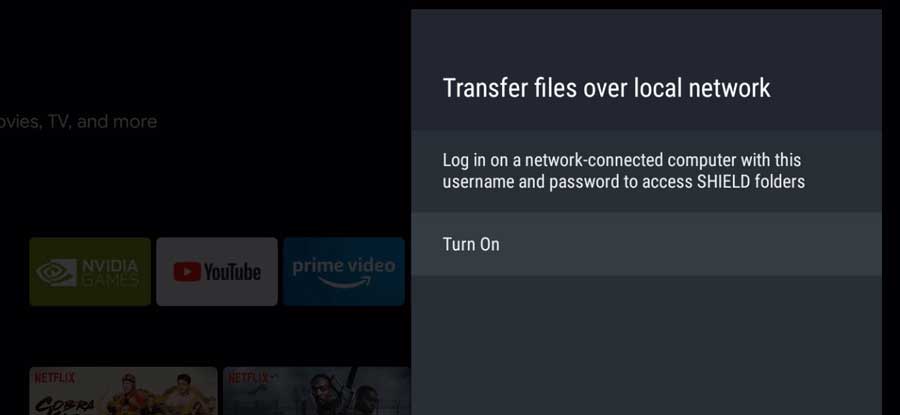
Click Turn On.
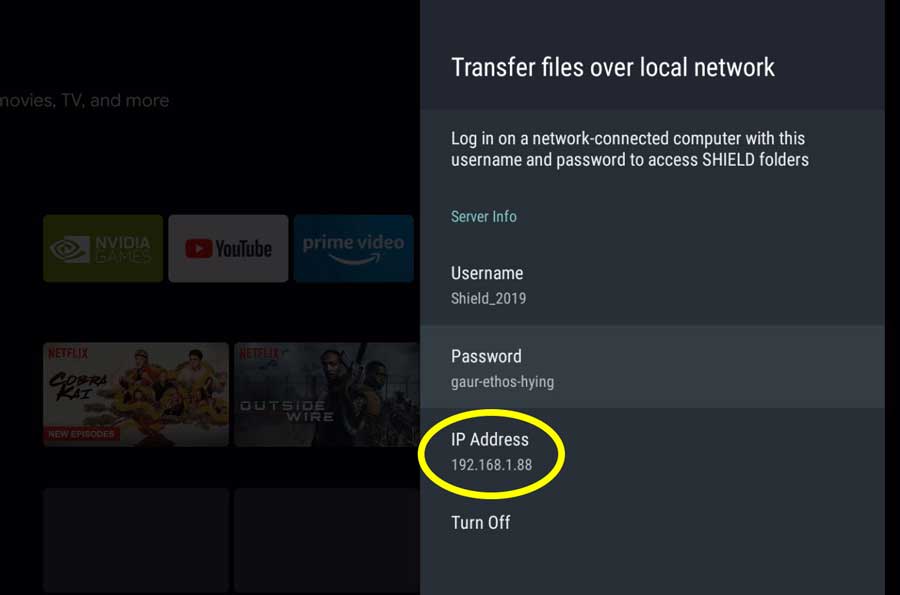
The next screen gives you all of the mission-critical information you will need to connect your PC to your NVIDIA Shield.
The system will generate a username and password for you. It will also display the Shield’s IP address on the network.
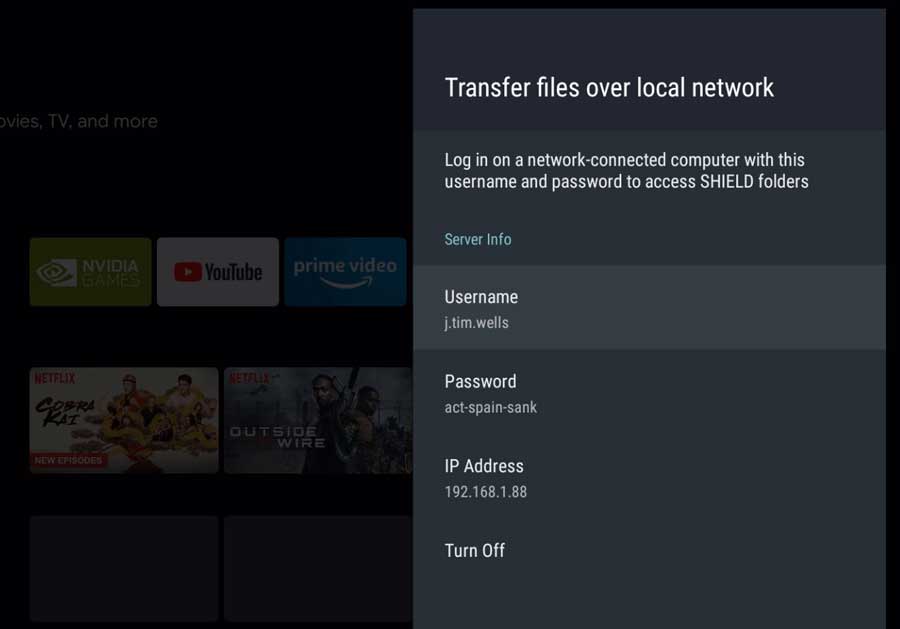
The username is based on your primary account’s email address. Usually, this is your Gmail account unless you’re using your NVIDIA Shield without a Google account.
You can change your username by selecting it.

Note: Your username doesn’t have to match your Windows PC username or anything else. It can be anything you want.
In my case, I changed my username to Shield_2019 to keep it simple.
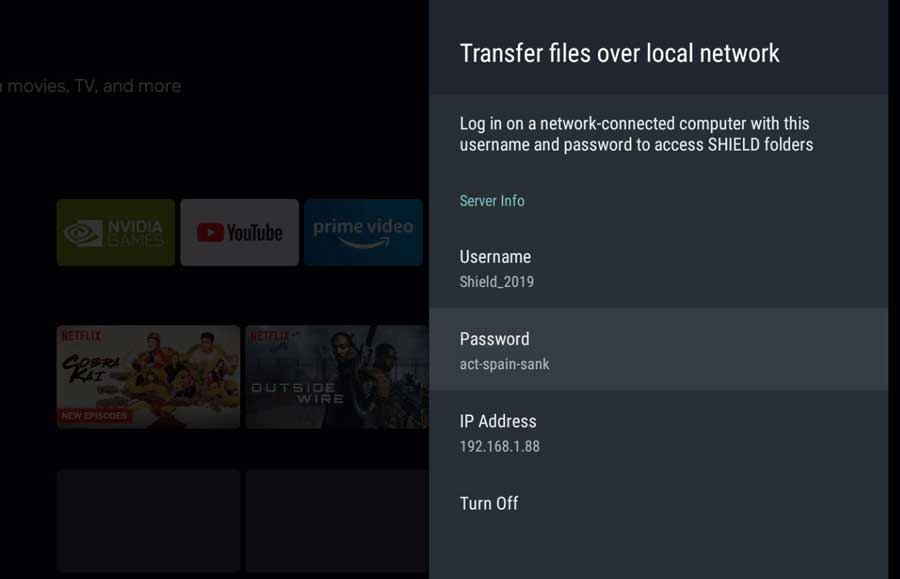
You can also change your password. However, you won’t be able to change it to anything you want.
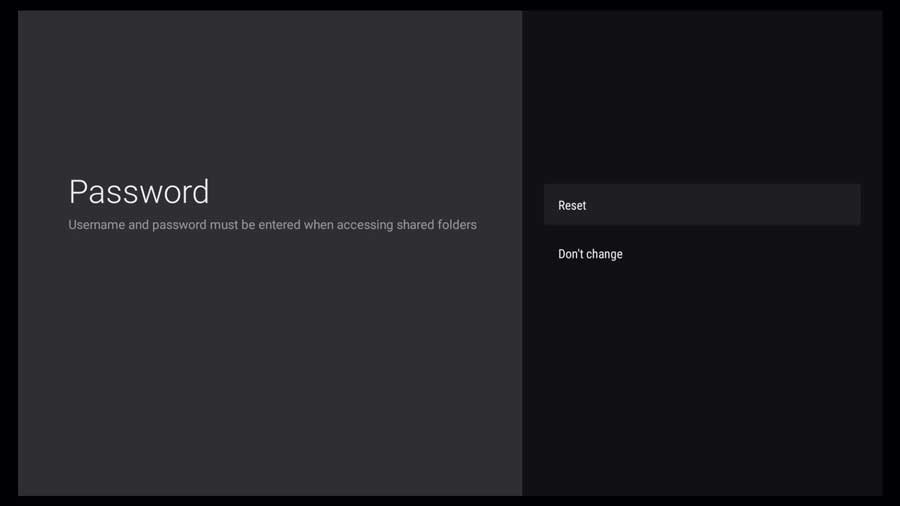
When you click on your password, you can reset it or leave it alone. Resetting it will make the system randomly select another password for you.
You may have to hit reset several times before you find one you’re comfortable with.
Once you have your username and password how you like them, it’s time to move over to your Windows PC.
Take note of your username, password, and IP address (circled above). You’ll need all three to connect your PC to your Shield TV.
Part 2: Connecting to Shield TV From Your PC
Believe it or not, the hard part is done!
On your PC, open up a new file explorer window. A great shortcut is to hold down the Windows key and press ‘E.’
Alternatively, you can type “file explorer” in the search field, which will also open one.
The easiest way to connect is to type your Shield’s IP address directly into the address bar.
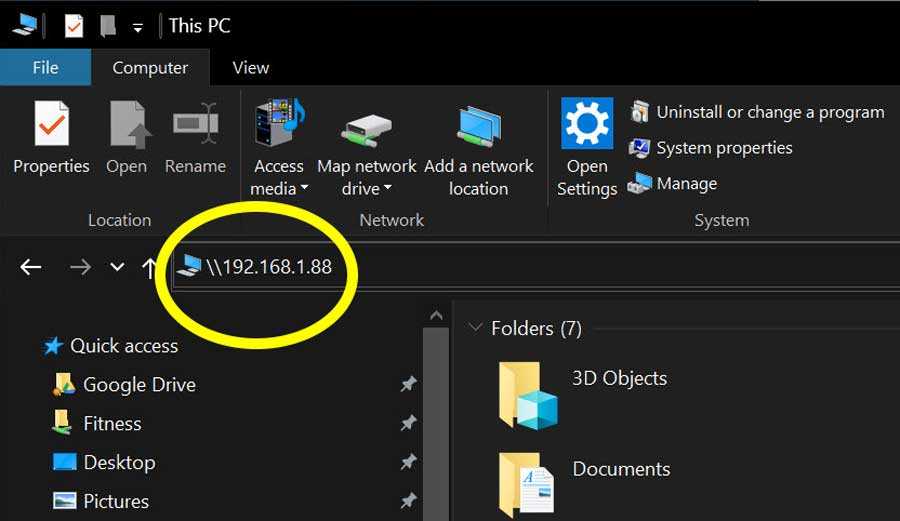
Note: When you type the IP address, you need to add two back slashes in front.
For example, my Shield’s IP address was 192.168.1.88.
When I type this in the address bar, I type \\192.168.1.88.
If you don’t add the back slashes, it will try to pull up that address in your default web browser instead of the file explorer.
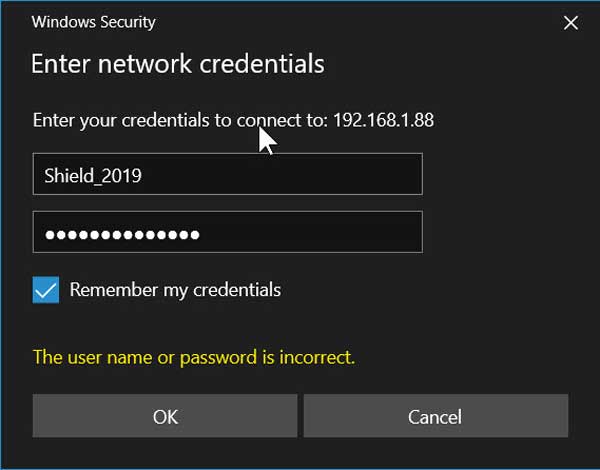
Windows will ask you for your network credentials if everything goes according to plan.
Enter the username and password you created in the previous step and click OK.
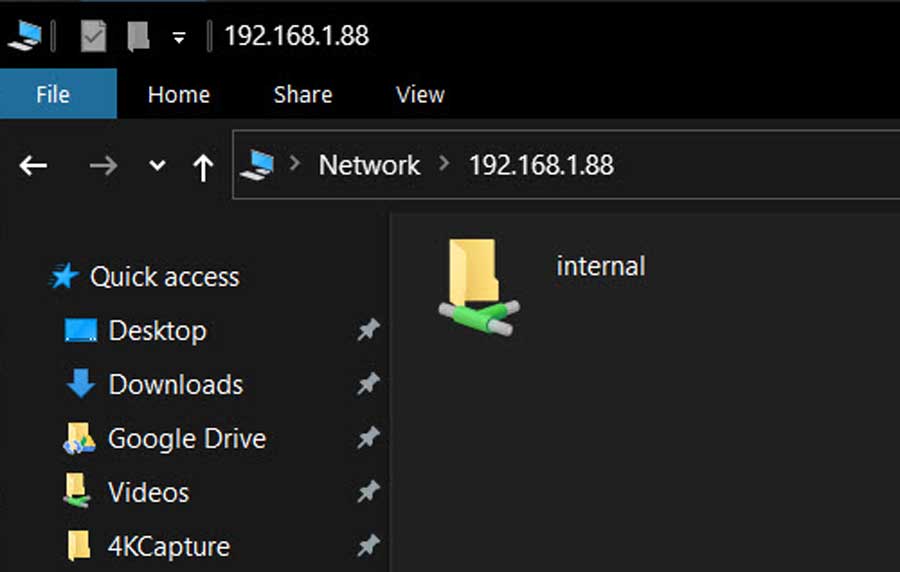
After a few seconds, the right-hand side of the window will change to show your Shield TV’s file structure.
You’ll see both Internal and External directories if you have an external hard drive, Micro-SD card, or USB flash drive attached. If not, you’ll only see Internal.
Click on Internal to see all of the Shield’s subdirectories.
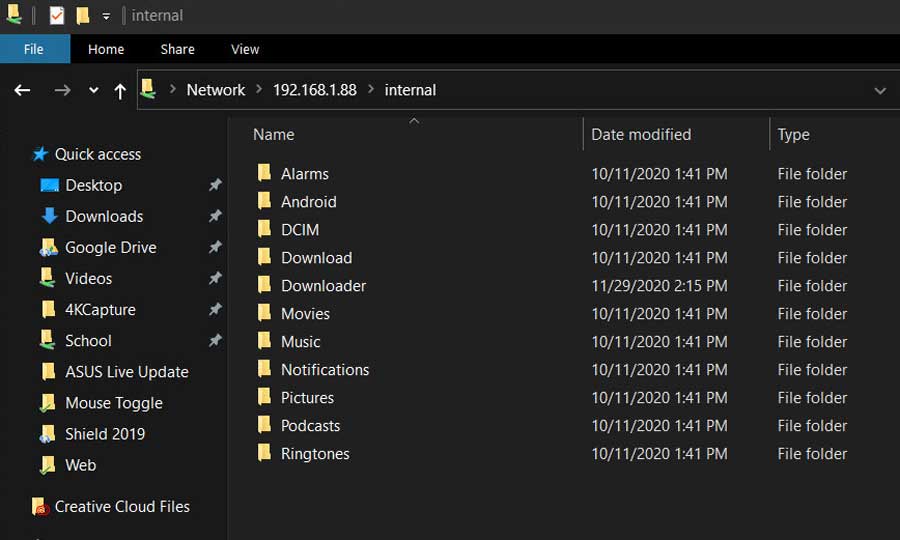
Now you can access your NVIDIA Shield’s folders directly from your Windows PC. You can copy movies, music, or images without a USB drive.
This is also a great way to sideload APK files to your Shield TV from your PC.
FAQ
Can I Connect My NVIDIA Shield to My Computer via USB?
Yes, you can connect your Nvidia Shield to your computer using a USB cable. Every NVIDIA Shield model, except for the 2019 Shield TV ‘Tube’, includes a USB port. You can connect a USB-A to USB-A cable directly to your PC.
Why Is My NVIDIA Shield Not Connecting to My PC?
If your NVIDIA Shield is not connecting to your PC, it could be due to various reasons, such as a faulty USB cable, incorrect settings on the NVIDIA Shield, or issues with the USB port on your PC. Try changing the USB cable, check if USB debugging is enabled on your NVIDIA Shield, and ensure that the USB port on your PC is functional.
How Do I Access Network Drives on NVIDIA Shield?
To access network drives on NVIDIA Shield, go to “Settings,” then “Device Preferences,” then “Storage,” and finally select “Network Storage.” Here, you can see the available network drives and access them. Check out my tutorial here.
Can NVIDIA Shield Access NAS?
Yes, NVIDIA Shield can access Network Attached Storage (NAS) devices. You can add a NAS as a network location in the “Network Storage” settings of your Nvidia Shield.
How Do I Enable SMB on NVIDIA Shield?
To enable SMB on NVIDIA Shield, go to “Settings,” then “Device Preferences,” then “Storage,” and finally select “Network Storage.” In the Network Storage settings, enable the option for SMB (Server Message Block) file sharing.

After a brief hiatus from the industry he's back at the helm of AndroidTVNews.com to bring Android TV and TV boxes to the forefront of the streaming world.
When he's not writing, he spends as much time as he can with his beautiful wife and his bulldog.
- How to set up and use Stremio with Real-Debrid on Android TV [2024] - August 18, 2024
- How to Install Kodi Diggz Xenon Plus & Free99 Build [March 2024] - March 3, 2024
- How to Enable Unknown Sources on Chromecast with Google TV [2025] - October 30, 2023