Last Updated on May 8, 2023 by Tim Wells
I have a problem: I love Android TV, but I’m beginning to hate Google.
So I started thinking about whether I could use my NVIDIA Shield and my other Android TV devices without linking a Google account to them.
It turns out that it’s possible. But it’s more complicated than you might think.
Note: All screenshots in this article were taken using an NVIDIA Shield TV (2019). The process would be the same for any Android TV device and very similar for a TV box running pure Android.
Why Google Wants Your Information
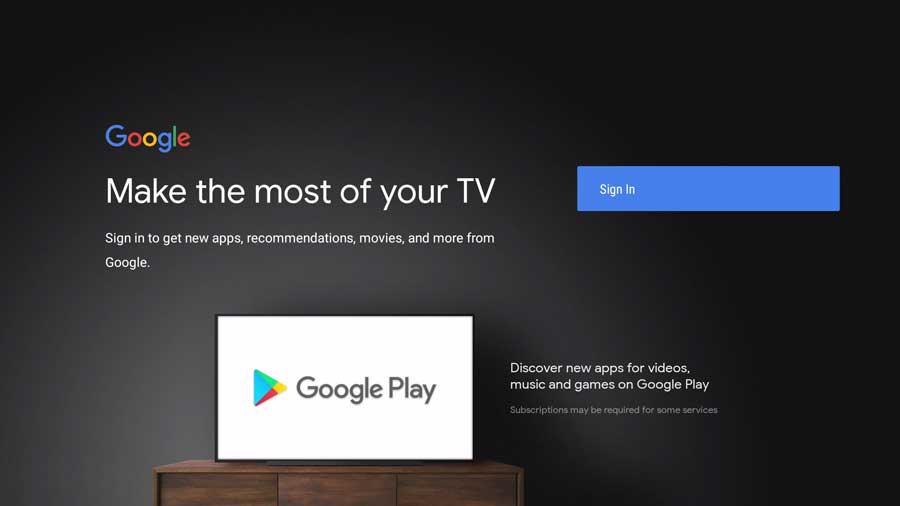
If you’ve ever set up an Android TV device, you’ve seen the dreaded login screen asking you to sign in to your Google account.
It’s obvious what Google gets when we link our Google account to our streaming devices.
They get to display ads tailored to our viewing habits and then sell that data to other companies.
How often have you made a single, random search on Google, and suddenly you’re seeing ads for the exact item you were searching for?
What we get out of the deal isn’t as clear, though.
That got me thinking about using Android TV without linking my account.
The official line from Google is that they need our Google account to keep our device safe if we lose it.
The theory is that they can wipe the device before someone else can steal your personal information.
After all, we have our email, contacts, banking information, and most of our passwords on our phones. It’s bad enough when we lose a single credit card. Imagine if our entire digital life was stolen.
But that argument doesn’t work for streaming devices that never leave our homes.
Can Android Work Without a Google Account?
OK, so the reason that Google gives us is rubbish.
Android works fine without linking your Google account, but many apps and services we rely upon don’t.
Let’s start with Google Play Services.
The Google Play Store, and everything associated with it, rely on your Google account to work.
Obviously, without a Google account attached to your device, you won’t be able to download the Google Play Store to download apps.
But there’s more to it.
Google Maps and Chromecast Built-in (Google Cast) also rely on your Google account.
That means having the same Google account on your phone, and Android TV will allow you to cast from your phone to your TV.
I use Chromecast built-in fairly often on my Android TV. Usually, I find a YouTube video on my phone and want to show it to my wife while she’s watching something else. Sometimes I want to watch a tutorial or embedded video on a website on my TV.
No matter your reasons for wanting to keep your Google account and TV viewing separate, you need to be aware of what you’re giving up.
Can You Bypass Signing in to Google Account?
Is it possible to set up a new NVIDIA Shield TV (or any Android TV) and bypass signing into Google?
Unfortunately not.
I’ve seen a few different tutorials showing a workaround, but Google closed those loopholes.
One of them suggested skipping the ‘Select WiFi Network’ step. Since there’s no network, your NVIDIA Shield can’t verify your Google account. Android Marshmallow added Factory Reset Protection which makes it impossible to skip this step.
I’ve also seen references to an Android APK that bypasses FRP, but there’s an easier way that I’m going to walk you through here.
Best of all, it doesn’t require rooting your device or bypassing any features.
Ready? Let’s get started.
How to Setup Android TV Without Google Account (kindof)
Since none of the workarounds I’ve seen work anymore, we need a way to bypass entering our Google account during setup.
Here’s where we get a little sneaky.
We need a Google account to go through the Android TV setup, but it doesn’t have to be a permanent account.
Google only checks for an account once during the setup process. After that, you’re free to remove it if you want.
That’s what we’re going to do here.
However, it’s more complicated than creating a temporary Google account. If you care about privacy, you want to ensure there’s nothing on that account that can tie back to your personal data.
Create a Temporary Google Account
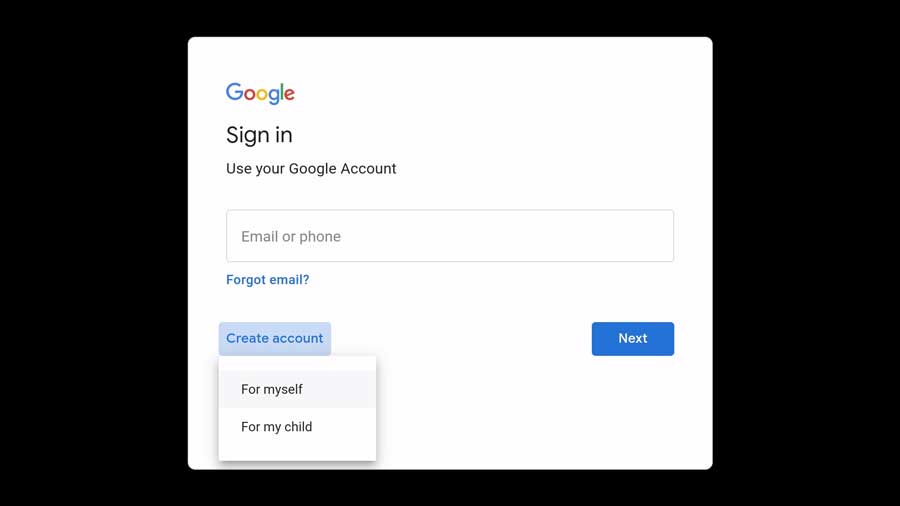
The first thing we’re going to do is Create a new account.
It’s crucial to select For myself and not For my child.
Accounts for children under 13 will need to be tied to an adult’s account. If you go that route, your personal information is still in Google’s systems.
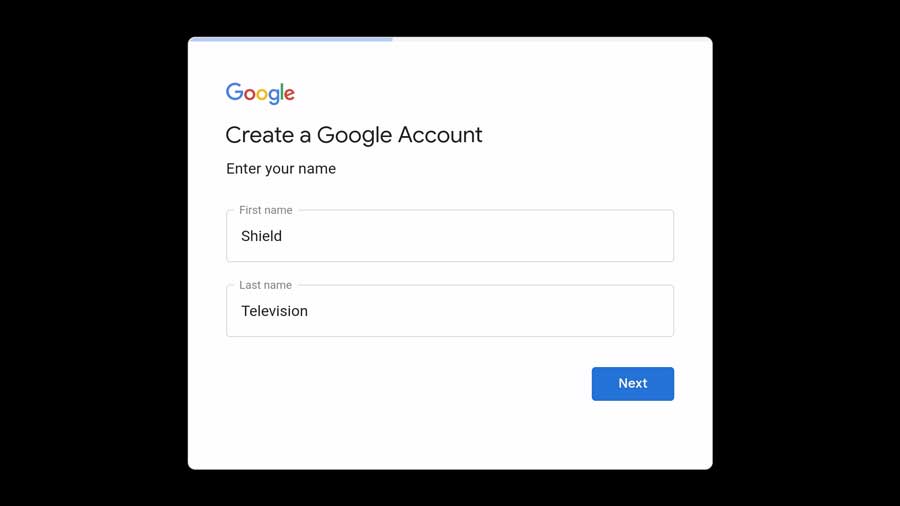
Then you’ll be asked to enter your first and last name.
Do not use your real name.
You can enter anything here since we will only keep the account for a short time. In this case, I entered something appropriate for my Shield TV.
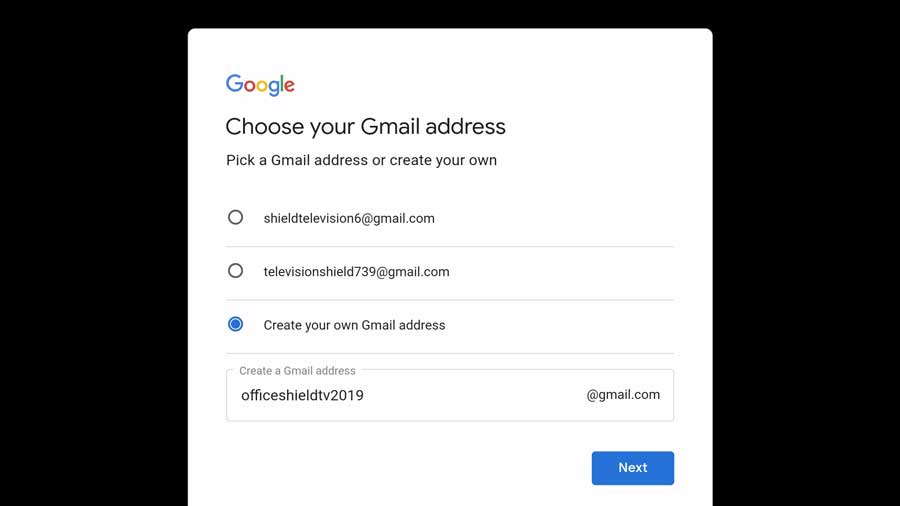
Based on what you enter, Google will try to create a Gmail address similar to your name. You also have the option to create an email address from scratch.
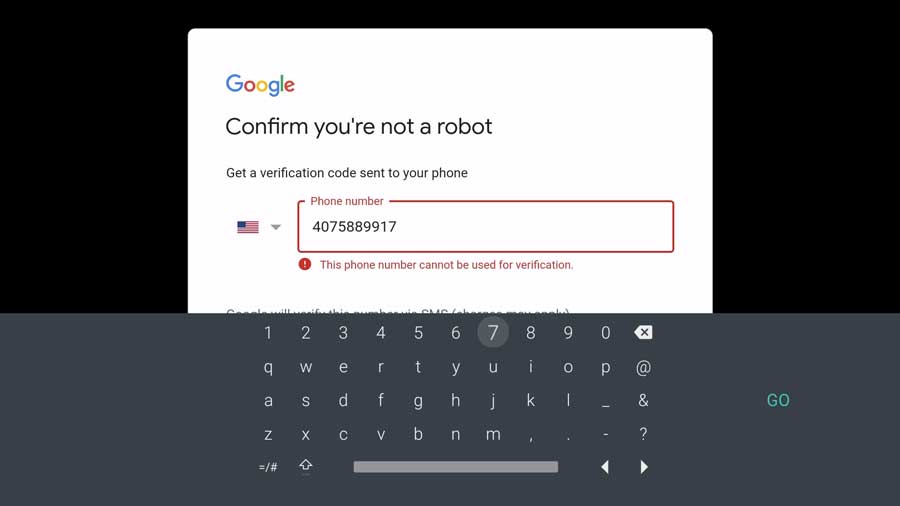
Next, Google will ask for your phone number to confirm you’re not a robot.
Do NOT enter your actual phone number here.
Google is very good at taking two data sets and finding common elements. So if your phone number appears on two separate email accounts, they’ll figure it out.
Get a Temporary Phone Number
We need a single-use, temporary phone number to receive the confirmation text from Google. Plenty of websites have temporary phone numbers that you can use once.
Unfortunately, Google rejected every one I tried. Either the number had been used too many times, or it couldn’t be used for verification.
After trying several different sites, I stumbled on an app called Burner.
It’s a great way to keep your real phone number private for friends or family and have another number you share with businesses.
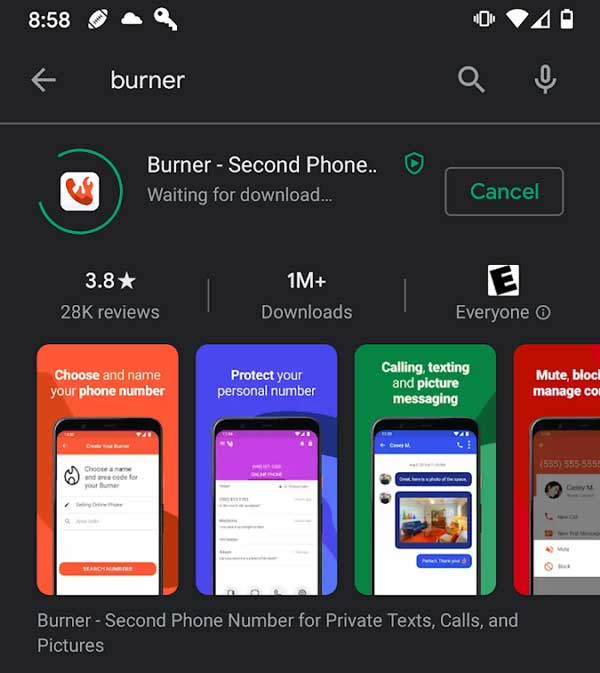
Burner is an app where you can create temporary phone numbers and keep them for as long as you have a subscription.
Even though it’s a subscription service, they offer a 7-day free trial.
That’s fine because we only need it for a few minutes.
Download the Burner app on your smartphone.
Based on your location, it’ll ask you to choose an area code for your temporary phone number. Then it’ll give you a few phone numbers based on that area code.
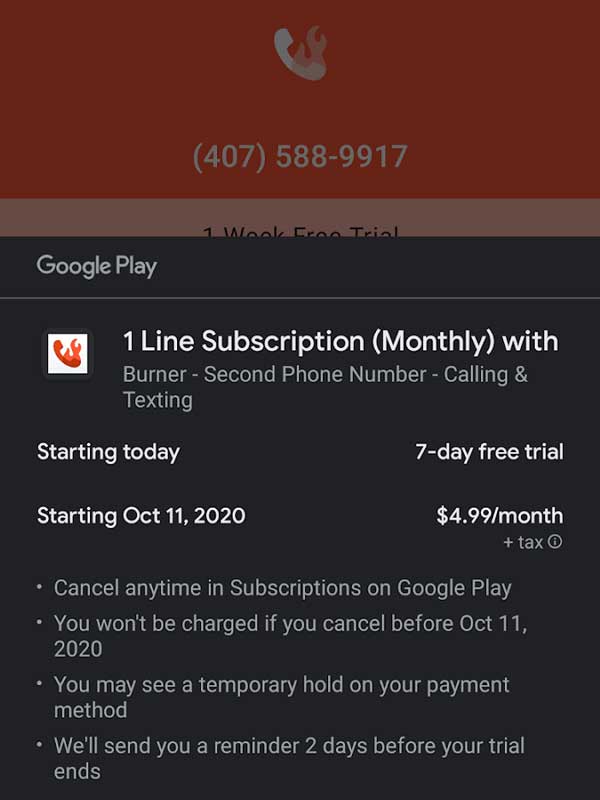
Finally, you’ll sign up for the free trial. Be sure to cancel your subscription after setting up your Android TV. Otherwise, you’ll be charged for the service.
Once that’s done, you’ll see the app’s main screen with your new phone number at the top.
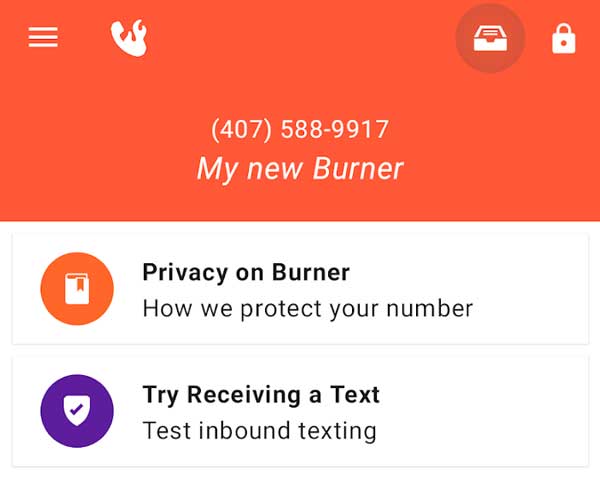
Now, hop back to your Android TV, and let’s finish setting up your temporary Google account.
Finish Setting Up Android TV
On your Android TV, you should be at the screen where Google asks you to enter your phone number.
Enter your Burner phone number.
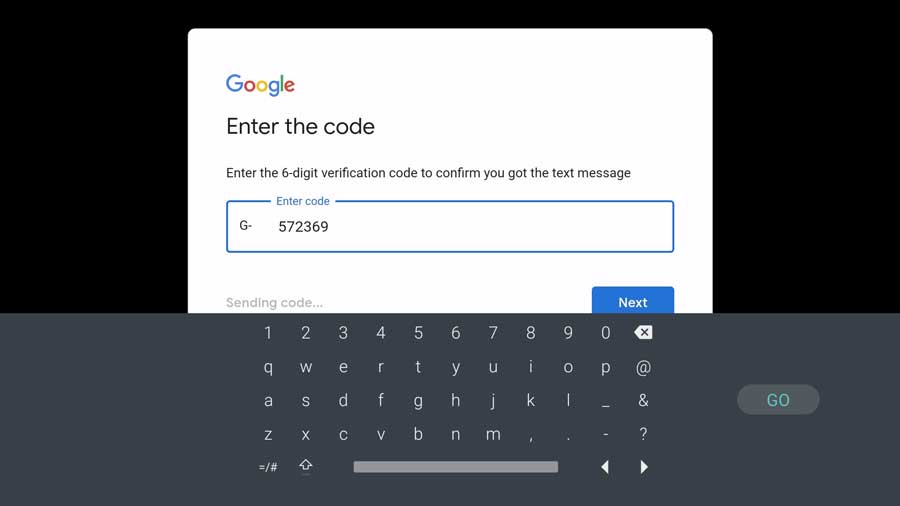
Within a few seconds, you should receive the verification text message from Google.
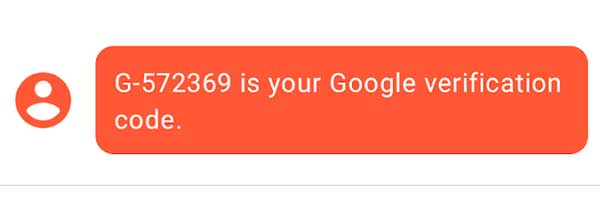
Then enter the code on your Android TV.
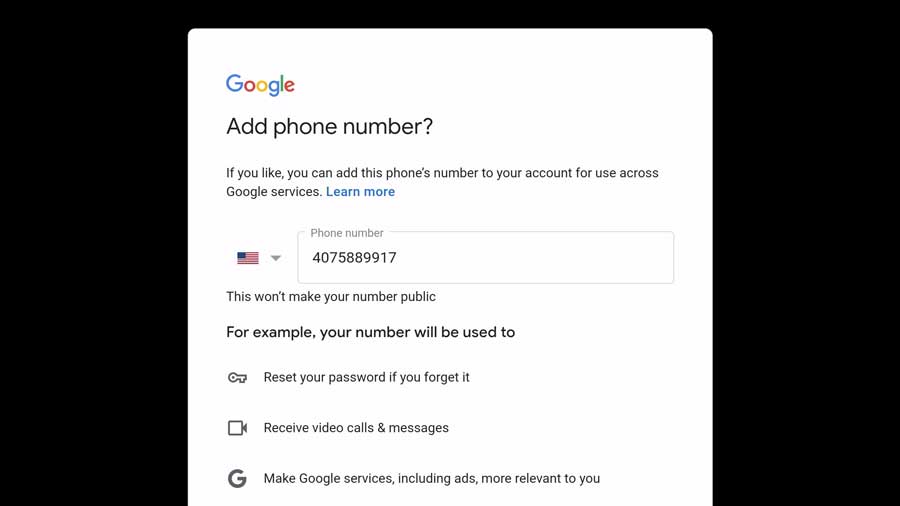
Once Google verifies the code, you’ll be asked whether you want to add your phone number to your account. The phone number will auto-populate in the window for you, so don’t click Next right away.
Google uses your phone number for sign-in and recovery and as part of some Google services. More importantly, they use it to tie your activity across multiple devices and accounts.
Make sure to delete your phone number from this field before continuing.
Next, you’ll go through some options on how Google will use your data. We won’t go into them in detail here, but I recommend choosing the most private option you’re given.
For example, here are my options:
- Don’t save my Web & App Activity in my Google Account
- Show me ads that aren’t personalized
- Don’t save my YouTube History in my Google Account
- Do not let Google use your device’s location
- Turn off Google Assistant
At this point, you can continue through the setup process as you usually would.
Once you get to the main home screen, you can go into your Settings menu and remove your account. You can also cancel your subscription to Burner since we won’t need it anymore.
However, there are a few things we should do first.
Before You Remove Your Google Account From Your Android TV
As I said earlier, tying your Google account to your Android TV enables many features that we rely on.
The most important is the Google Play Store, so we need an alternate way to download apps.
Install Downloader for Android TV
Everyone has their favorite app store. Personally, I like Aptoide TV, but there are so many others to choose from as well.
Unfortunately, none of them are available in the Google Play Store. They all need to be sideloaded onto your device.
The easiest way to sideload anything is to install the Downloader app for Android TV and Amazon Fire TV.
This app includes a basic web browser so you can navigate to any website, download an APK file (Android installation file) and install it – all from a single app.
To me, Downloader is always one of the first apps I install on my devices. It enables me to do many things that Google tries to lock down.
For more details on installing the Downloader app for Android TV and what it can do for you, check out my in-depth tutorial here.
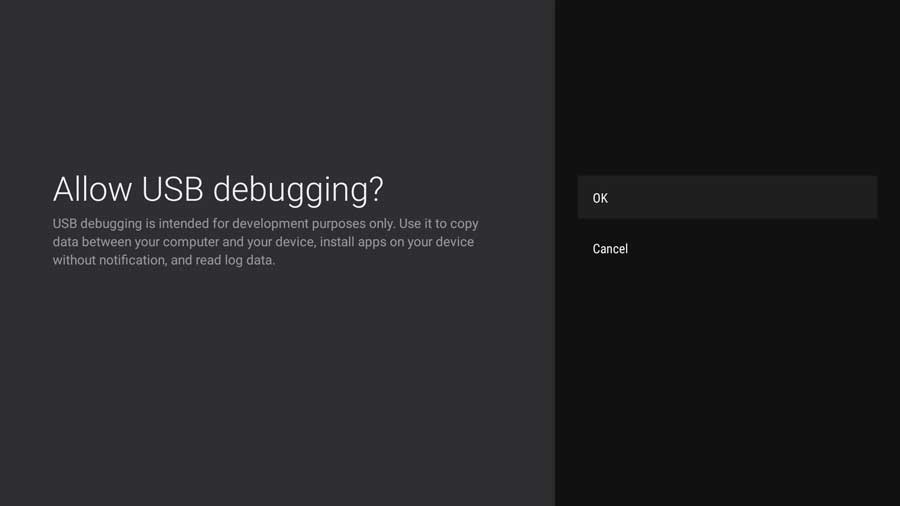
Enable Developer Options
Did you know that there’s a hidden settings menu on Android and Android TV?
The Developer Options settings menu allows you to change settings to have a lot more control over your device and how it operates.
Be very careful with any settings you change in the Developer Options menu. Changing the wrong setting can cause your system to become unstable.
The feature we’re most interested in is enabling USB Debugging and\or Network Debugging.
In most cases, you’ll only need to enable USB Debugging. However, if your device lacks a USB port, like the new NVIDIA Shield TV, then enable Network Debugging instead.
How do I Remove a Google Account from NVIDIA Shield or Android TV?
Once you’ve done both of those things, it’s time to remove your temporary Google account.
I’ll show this process on my NVIDIA Shield TV, but it’s the same for any Android TV.
Click on the gear icon in the upper right-hand corner of your home screen to open your Settings menu.
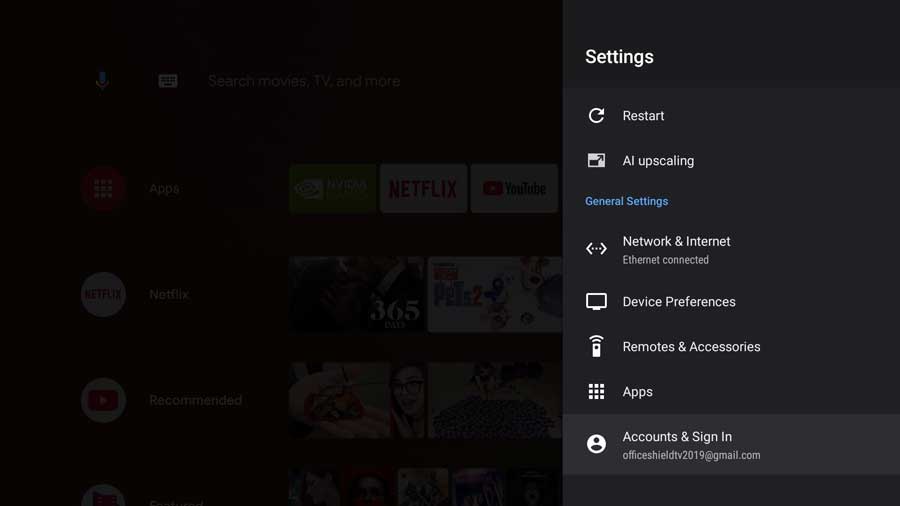
At the bottom of that menu, you’ll find Accounts & Sign-In. Your Google account should appear in smaller text right below it.
Click on it to continue.

You can add or modify an existing account in this menu.
Click on your Google account to continue.
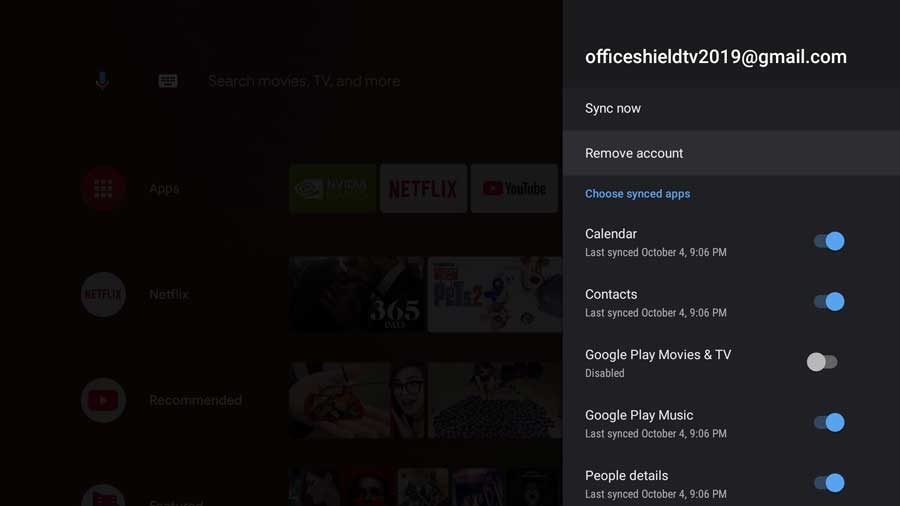
You can choose what information you want to sync with your account on this menu, like your calendar or contacts. Since we want to remove our Google account, click on the Remove Account option at the top.
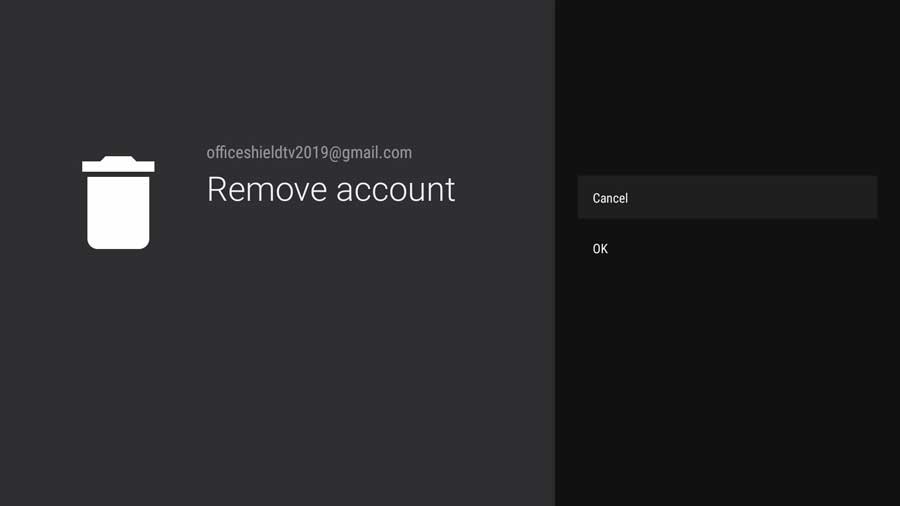
Android TV allows you to reconsider before removing your Google account.
Click OK to continue.
Once you return to the main menu, your Google account will no longer be listed.
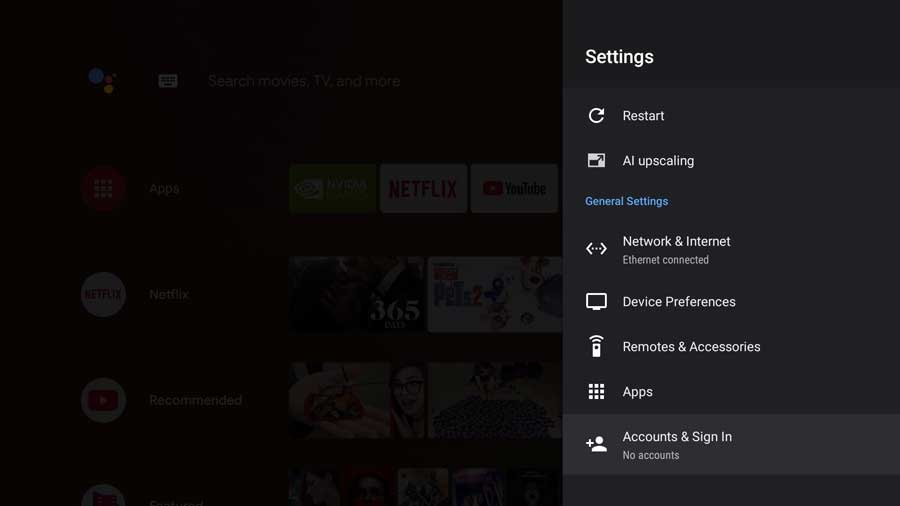
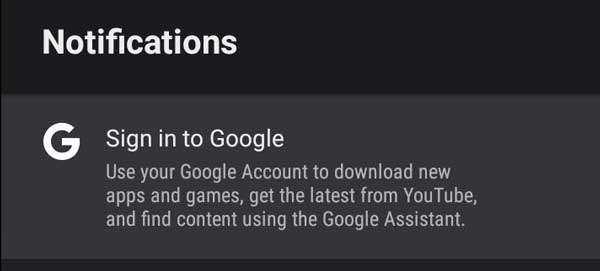
As soon as you remove your Google account, you’ll get a permanent notification asking you to sign back in. Unfortunately, there’s no way to make this notification disappear, but it’s easy to ignore.
Conclusion
Google doesn’t make it easy for us to use Android without linking your Google account to the system.
They like having the ability to track you across all of their platforms, and your Google account is the best way to do it.
Even if you’re one of the millions of people who use a VPN but still log in through Google, your data is still being tracked. Removing your Google account from your Android TV is a great way to keep your data private.
For more great articles like this, head to my NVIDIA Shield TV resource page. You’ll find all my tips, tricks, reviews, and tutorials to help you get the most out of your NVIDIA Shield.

After a brief hiatus from the industry he's back at the helm of AndroidTVNews.com to bring Android TV and TV boxes to the forefront of the streaming world.
When he's not writing, he spends as much time as he can with his beautiful wife and his bulldog.
- How to set up and use Stremio with Real-Debrid on Android TV [2024] - August 18, 2024
- How to Install Kodi Diggz Xenon Plus & Free99 Build [March 2024] - March 3, 2024
- How to Enable Unknown Sources on Chromecast with Google TV [2025] - October 30, 2023