Last Updated on September 6, 2023 by Tim Wells
For those of us who have collected tons of movies, music, or TV shows over the years and don’t wish to be bound to a paid streaming service, Plex is just what we need.
Yet depending on your router setup, trying to configure remote access to your Plex library can be technically tricky.
In this walkthrough, we’ll ensure you get up and running quickly, covering everything you need to know for setting up Plex port forwarding.
What is Plex?
Here’s a basic refresher: Plex is a media player that helps you organize and play your media library on all your devices.
It takes the movies, music, photos, and TV shows stored on your hard drive or NAS. It converts it into a beautiful, organized menu of your favorite content for free.
Download the Plex app on your mobile devices, TVs, and streaming devices to enable easy streaming anytime, anywhere.
Free ad-supported live TV and movies are available. Nevertheless, Plex Pass is worth considering if you are a true film lover or an audiophile.
Access Your Plex Library On The Go
As I mentioned, most people use Plex to organize their media library and play them back over their local network. However, Plex also offers remote access to your media files, even when you’re not at home.
With Plex Remote Access, you can enjoy your movies and TV shows while on the go.
Theoretically, you only need to enable remote access in the settings menu, and Plex will take care of the rest. In some cases, there may be some additional hoops to jump through.
That’s where port forwarding comes in.
What is Port Forwarding?
Your router’s job is to route internet traffic through specific preset settings.
In the same way that most machines cannot think for themselves, you’ve got to tell the router what to do.
Most people barely touch their routers since they set them up. If that’s you, chances are your router’s default port settings will block specific traffic from flowing smoothly.
Think of your router as an air traffic controller, directing planes (your data) to different runways (ports) to get them where they want to go. If a particular runway (port) is closed, it can’t accept any incoming traffic.
A specific port must be opened on your router to enable remote access on Plex.
Plex Remote Access: Automatic Setup
Most people will not encounter issues enabling Remote Access with their Plex Media Server.
Plex automatically configures the forwarded ports on your router with no manual requirement on your part.
Remote Access requires routers that support either UPnP or NAT-PMP auto-configurations.
UPnP means Universal Plug and Play, the typical protocol which allows new devices on your network to connect to their existing devices through remote access.
For example, when you buy a new phone, your computer automatically recognizes it on your home network. That’s usually done through UPnP.
A lot happens behind the scenes.
Generally, with new devices, it works like this:
- New Device A turns online and joins the network.
- It receives a private IP address. Think of it as a sub-IP address to that of your router.
- It uses the name or gives itself a name automatically to appear visible on your network.
- It starts interacting with pre-existing devices on your network.
It’s that easy. NAT-PMP follows the same principle but is found mainly on Apple products.
But in simple terms, both equate to automatic port forwarding.
The ports of applications and devices on your network open and close automatically, so you don’t have to dig through user manuals or how-to guides.
How to Enable Plex Remote Access
Assuming you have UPnP or NAT-PMP enabled on your router, the first step is to sign in to your Plex Media Server and go to the Settings menu.
In my case, I use a Windows 10 desktop as my Plex Media Server, connected to my Synology DS920 NAS over Ethernet.
The Remote Access settings menu is on the left-side menu, directly underneath the General tab.
Once you click on it, you’ll see something similar to the image below.
If you don’t see all of the options that I’ve got, you should click the Show Advanced Settings button.
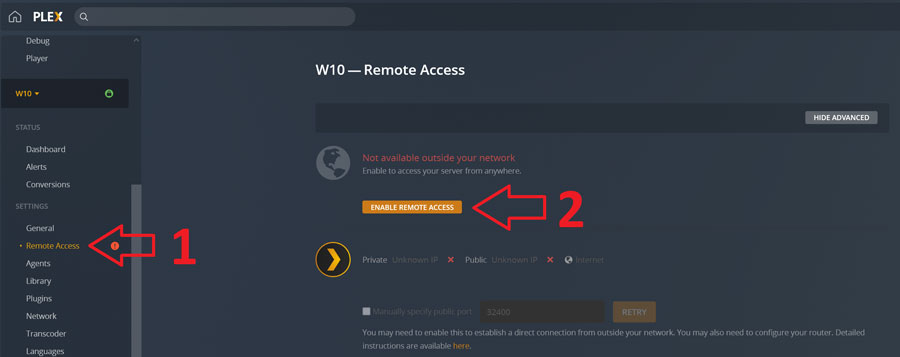
In most cases, clicking on the Enable Remote Access button will automatically configure Plex for remote access to your media library.
If everything works the way it should, you’ll get a message like this:
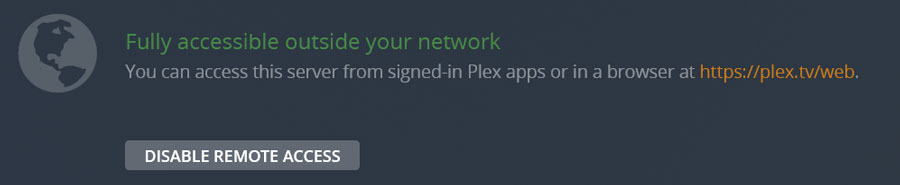
If your Plex library is still unavailable, you must manually enable port forwarding using the manual port-forwarding process in the next section.
Manual Plex Port Forwarding
We’re going to outline the steps for a Linksys router. However, most major commercial routers, like Netgear or ASUS, will have a similar process to setting up manual port forwarding.
If you don’t have a Linksys router and own instead of another major brand like Netgear, then have no fear.
The steps should be similar to the ones below.
Look for the tab where you’re adjusting the configurations under Port Forwarding. Often, you can find this under a leading tab such as Advanced.
Also, most routers have a basic user manual and a contact number for their technical service team.
Setting Up Your Router
- Open up your web browser from the computer holding your Plex media files.
- Type in the IP address of your router into the URL line as: “192.168.1.1/.” This is the standard IP address for most routers, but yours may differ. Please check your router’s user manual or contact the customer service line of your internet service provider if you need help.
- Find and open the “Applications & Gaming” tab. Select the subsection “Single Port Forwarding.”
- We’re going to add a new line titled “Plex Port Forwarding” (you can choose what mix of characters you prefer), and type the following settings, left-to-right:
- External Port = any number between 20,000 and 50,000, written without the comma.
- Internal Port = always 32,400, again without the comma.
- Protocol = “Both”
- To IP Address = 192.168.1.[111]. Best if this is any number between 100 and 150. This is called your Static IP Address.
- Enabled = check.
- Reserve your Static IP Address.
- Find and click the tab “Setup.”
- Scroll down the page and click the “DHCP Reservation” button to Enabled.
- In the uppermost table, find the device you wish to connect your Plex to and check its box at the rightmost column of its row; a new row is going to appear under “Clients Already Reserved.”
- This is where you can assign the last three digits of your Static IP Address, such as 111.
- Save your settings and exit.
Configuring Your Plex Account
All you need to do here is specify the External Port for your Plex port forwarding.
- Login to your Plex Web App.
- Go to Settings > Server > General.
- Then click Remote Access.
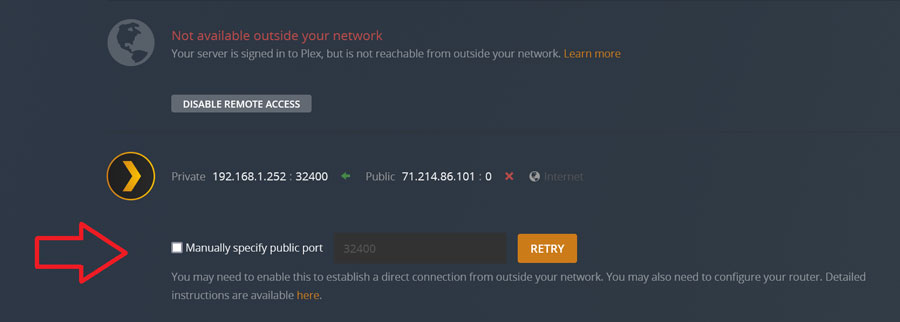
- Toggle the Show Advanced button.
- Click the checkbox next to “Manually specify public port.”
- Enter the External Port you set up in step 4a.
- Click the Retry button.
Troubleshooting Your Firewall
If you’re still having trouble with your Plex port forwarding, the issue may be your firewall settings.
Using the example of a Windows operating system, I’ll walk you through turning off the specific settings we need to without endangering your network or computer.
- Start > Control Panel > System Security (or type to search: firewall).
- Click Advanced Settings.
- Turn off your firewalls under Domain, Private and Public Profiles.
- Log back into your Plex Web App settings to retry your port connection.
- If it now works, then the issue was your firewall. If that’s the case, you only need to apply a special rule for the Internal Port of Plex, 32400.
- Go back to Advanced Settings > Inbound Rules.
- Click New Rule.
- Click Port.
- Keep TCP as it is.
- Type 32400 into the line of Special local ports.
- Click Allow the connection.
- Click all profiles (turn the check on).
- Name this rule “Plex Port Forwarding” or whichever you prefer.
- Click Finish.
Make sure to turn all of your firewall profiles back on.
Try to connect again with your Plex Web App. If done correctly, you should be ready to stream!
If it’s still not working, the issue could be a “Double NAT.”
What is NAT?
NAT means Network Address Translation.
This protocol enables all your devices to share the single IP address provided by your internet service provider. It facilitates the creation of private IP addresses for your devices, each having its own and each linked to the overarching single IP address.
Think of it as a tree diagram where we start at the top with one address.
What is Double NAT?
This occurs when you have a router behind a router.
For example, a WiFi router plugged into the modem from your internet service provider, which is itself providing a NAT. That means that two NATs are assigning two different private IP addresses for each of your devices.
In this context, devices on the first private network cannot communicate with those on the second. Like one only speaks English and the other Japanese.
In plain language, this can mess everything up. But don’t worry, you can fix this quickly.
Detecting Double NAT
The first step is to find the settings of the WiFi router (not the modem’s) and determine its IPv4 address.
If the two IPv4 addresses match, you do not have a double NAT problem, but if the two IPv4 addresses do not match, then we have some trouble.
How to Fix a Double NAT
The best bet is to try and set one of the devices, such as the modem or the WiFi router, to Bridge Mode, so only one is providing NAT services. So instead of two intersections, each being a modem or router, one magically changes into a straight highway.
Contact the technical support of your internet service provider to help you set up either your modem or router in Bridge Mode. This is the easiest and safest solution.
You can try this yourself, but the process does change with the router brand or service provider.
Enabling Bridge Mode on Your ISP Modem/Router
Generally, the instructions will follow the below framework.
- Open up your web browser and find your router’s login page, as we did with the very first step in this article.
- You want to find an option titled similar or identical to “Wireless Options.”
- Toggle Bridge Mode on.
Enabling Bridge Mode on Your Router
If you’d like to use the NAT of your ISP device instead of your router, no problem.
The steps will likely be the same but with one key difference: you are looking to toggle on the option “Access Point.”
This is the same thing as turning an intersection into a bridge.
Blocking IPs
Sometimes your firewall can block specific IP addresses trying to connect with yours.
Often, this happens with advanced firewalls severely restricting traffic.
This commonly occurs in public spaces like offices, schools, or hospitals. Blocking IPs can help if your router tries connecting to multiple sources.
Frequently Asked Questions
Do you still have some questions?
No problem.
Here are the most common issues you might encounter during the Plex port forwarding setup process.
My Plex App isn’t finding my Plex Media Server. Why?
Occasionally, older versions of the Plex App or the Plex Media Server can encounter problems finding the server.
Ensure that both are updated and restarted before trying again. Then, sign in to your Plex Media Server and then into your Plex App.
You want to ensure you’re on a single NAT or just one network.
If the automatic port configurations went well, you should be running smoothly. If not, please check out our troubleshooting guide above.
Is it safe or recommended to use manual port forwarding with Plex?
If the automatic option isn’t working for you, it is necessary.
Manually configuring port forwarding in Plex media server is safe.
However, make sure your internet connection itself is secure and encrypted. Follow the steps outlined above to get everything set up.
Remember that port forwarding occurs on all networks automatically. We really wouldn’t be able to use WiFi without it!
What about multiple port forwarding for several Plex Media Servers? Is it possible?
Yes! Follow the same process as single port forwarding, but with one caveat. Change the External Port from, for example, 32400 to 32401.
The External Port of each Plex Media Server must have a unique number that helps traffic over your network flow smoothly, much like cars on the highway staying in their lanes.
You should be good to go as long as all the servers are separate and linked to the correct ports.

After a brief hiatus from the industry he's back at the helm of AndroidTVNews.com to bring Android TV and TV boxes to the forefront of the streaming world.
When he's not writing, he spends as much time as he can with his beautiful wife and his bulldog.
- How to set up and use Stremio with Real-Debrid on Android TV [2024] - August 18, 2024
- How to Install Kodi Diggz Xenon Plus & Free99 Build [March 2024] - March 3, 2024
- How to Enable Unknown Sources on Chromecast with Google TV [2025] - October 30, 2023