Last Updated on June 18, 2023 by Tim Wells
I love ripping the plastic off new tech and opening up the box. But if you’ve bought a new Android TV box recently, you’ve probably figured out that the setup instructions are a bit…lacking.
I’ve reviewed dozens of Android boxes and Android TVs, and they all have one thing in common: the setup documentation sucks!
Most Android boxes don’t include a manual at all!
If you’re lucky, you’ll get a picture diagram of all the different plugs and ports. However, that doesn’t tell you how to set one up.
On my old website, I’ve written one of the most popular setup guides for Android TV boxes on the Internet.
However, It’s been a few years, and I think it’s due for an update. That’s exactly what we’re going to do in this article.
So, if you’ve been looking for the best Android TV box user manual and setup guide for your TV box, Android box, OTT box, or Android TV box…your wish is granted.
Ready?
Let’s get to the fun part!
How to Connect an Android Box to Your TV
No matter what device you buy, the first part of setting up your Android TV box is hooking it up to your television. In almost every case, that will be through an HDMI cable.
Some manufacturers STILL don’t include an HDMI cable in their boxes. I’m looking at you, NVIDIA.
However, you’re going to need one, no matter what. HDMI stands for High-Definition Multimedia Interface, and it’s been the standard for televisions since around 2008, when it became mainstream.
HDMI Cable Not Included?
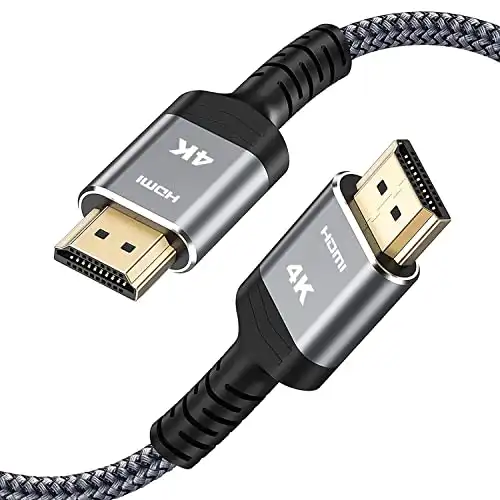
If you didn’t get an HDMI cable in your Android box, don’t fall for the trap of buying super-expensive cables from those big-box electronics stores.
Take it from someone who used to work for one (Circuit City). Those cables are about 90% profit margin.
There have been several independent studies that found that all HDMI cables are the same. Unless you’re a videophile with insanely expensive hardware, save your money.
I like cables that have a more durable, braided wrapping. They don’t snag as often, and it makes it harder for my dog to chew through them.
The cable underneath is the same as the budget version. You don’t need to spend more than $10 on a cable.
Where to Plug the HDMI Cable
Unlike many other cables, HDMI cables are super-easy for beginners to hook up. Because of their design, they only fit one way, so you can’t force them into a port they don’t belong in.
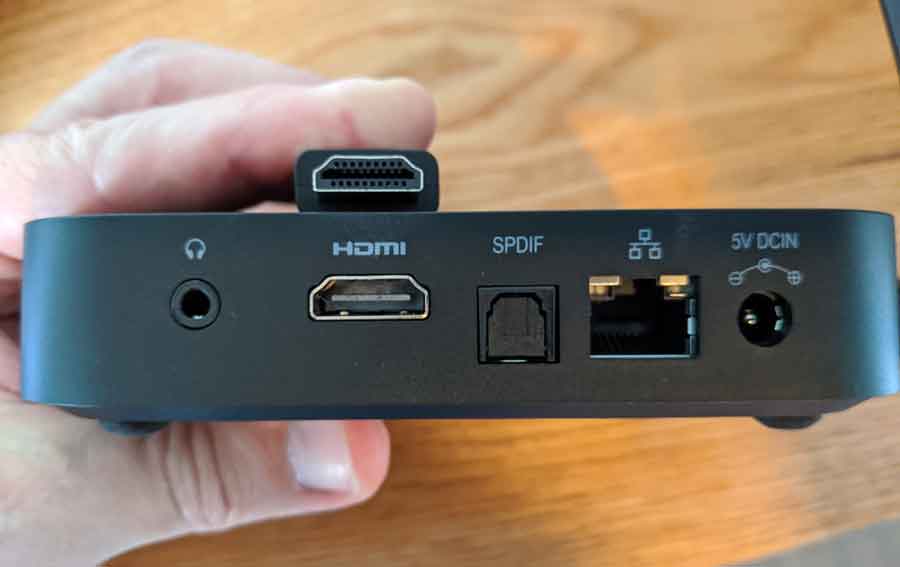
As you can see in this picture, most HDMI ports on Android TV devices are clearly labeled. That makes setup easy.
Step 1: Plug the HDMI cable into the HDMI port on your Android TV box.
Since most components use HDMI, most modern televisions will have several HDMI ports.
For example, my 32” Samsung has three HDMI ports, and my 55” Sony has four.
Step 2: Plug the other end of the cable into an empty HDMI port on your television.
Tip #1: Most televisions label their ports (HDMI 1, HDMI 2, etc.). Make a mental note of which port you plug your Android TV box into. You’ll need it later.
Tip #2: HDMI cables are fairly durable. But you have to be careful not wiggle the cable once it’s plugged in. The one place I’ve seen HDMI cables fail and break is where the brass connection meets the plastic cable. Always pull your HDMI cable straight out of the port on your device.
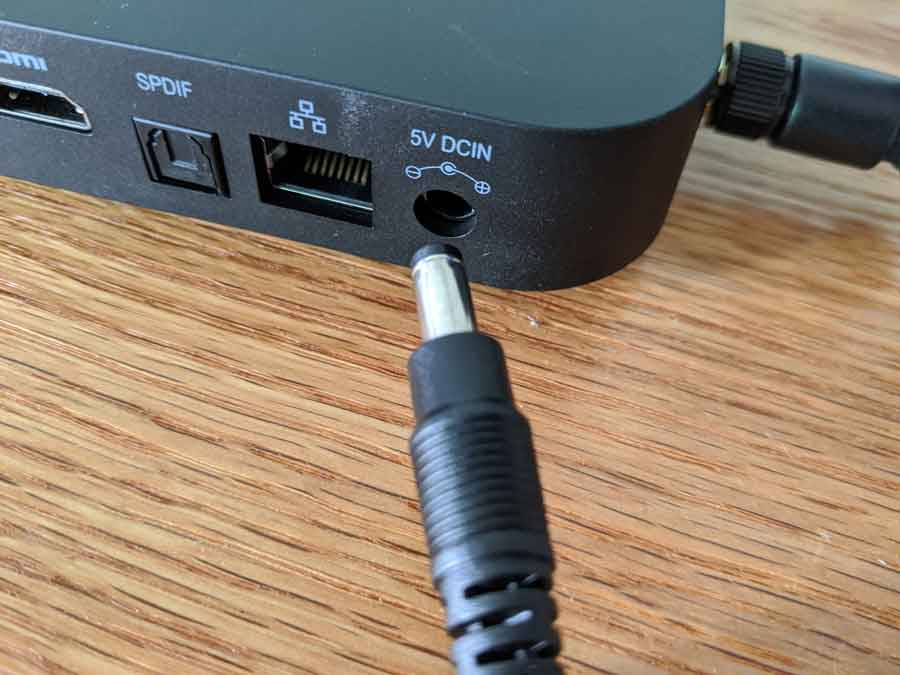
Plug in the Power
This is probably the connection you’re most familiar with. Power adapters generally look the same, no matter what device you buy.
Most will have a small, circular plug connected to an AC adapter. Manufacturers are good about making sure that the cable will only fit on one port on the device.
This port is usually labeled ‘DC in’ (or similar).
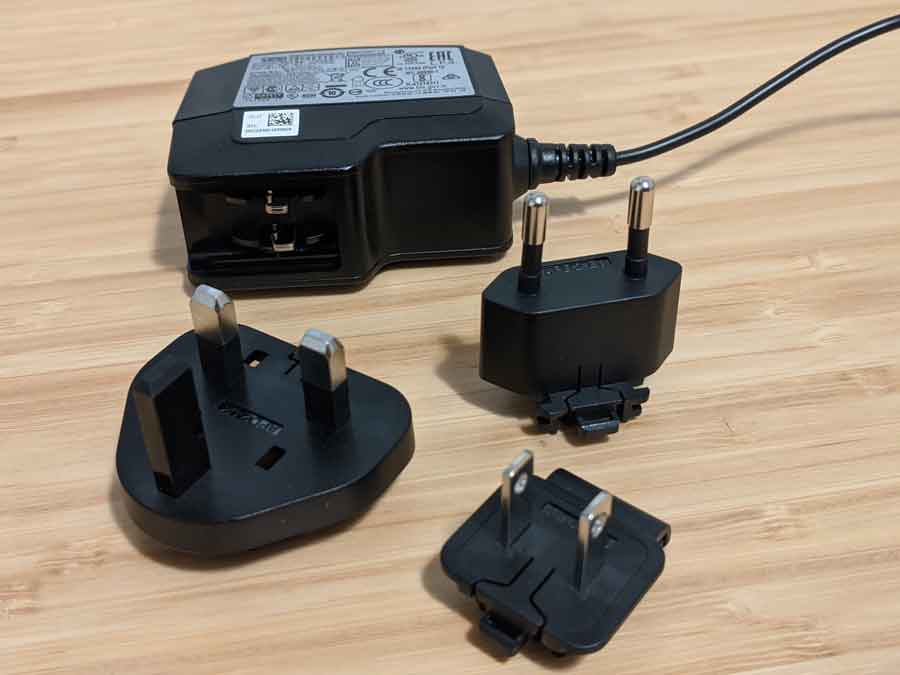
Sometimes, you’ll get a power adapter and a selection of different ends.
This is a cost-saving measure for the manufacturer. It’s cheaper to design one universal power adapter for every country than three separate adapters for each market in which they’re selling devices.
Here you can see a universal adapter and the three different power connectors. Snap in the adapter that fits your local area and discard the others.
Step 3: Plug in the Power.
Turn on Your Television
Either way, you’ll first want to turn on your television and switch to the correct input.
Back in Step 2, you plugged the HDMI cable into a specific port on your television. Most televisions number their HDMI ports. Now, you will want to switch to the Input on your television corresponding to the correct HDMI input.
The process for selecting that input will differ for each television, and, frankly, there are too many possibilities to list here.
However, most television remote controls will have an Input or Source button that will cycle through your different ports. Many also have an on-screen display telling you what port is active.
Turn on Your Android TV Box
Once you find the correct TV input, the next step is to ensure your Android TV box is powered up.
Many devices will have a status light to let you know when they’re on, but that’s not always true.
If it doesn’t look like your Android box is powered on, the best thing to do is press the power button on your Android box’s remote control OR the button on the device itself.
Tip #3: Only press the button ONCE. It’s normal for computers, tablets and Android devices to take a few seconds to power on. Pressing the button repeatedly could inadvertently turn it back off again.
Once your Android TV box is on, it should display a graphic or “splash screen” on your television.
Step 4: Wait for the device to fully power on and reach the main launcher screen.
Choose Default Launcher
When you initially boot to the device, you may get a pop-up dialog box at the bottom of the screen asking you to choose a default launcher.
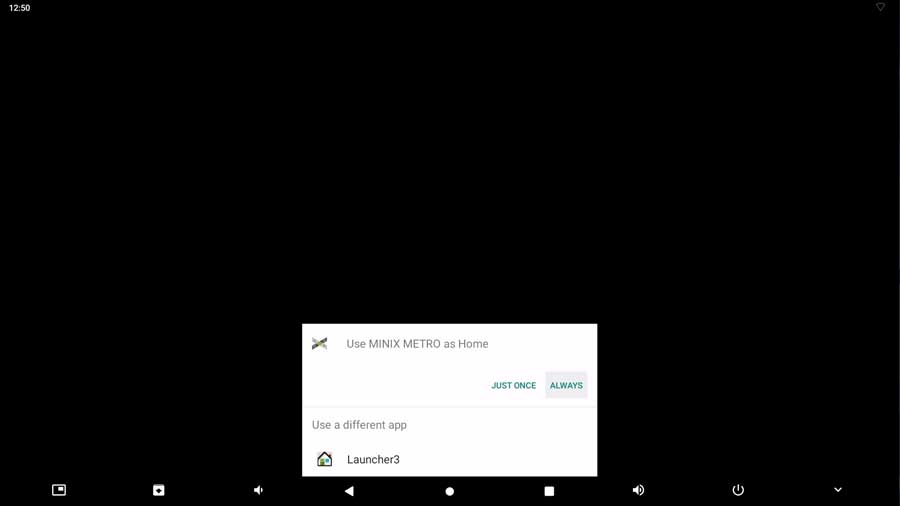
In general, choosing the launcher your box manufacturer has developed is a good idea.
The stock Android launcher was initially designed for touchscreens. That means the placement of icons and apps will work better with swiping than with a TV remote.
If you get a dialog box like this one below, click Always to boot to their custom launcher.
If it turns out that you don’t like it or want something different, you can always change launchers later.
Connect an Android TV box to Wi-Fi or Ethernet
Once your Android TV box is powered up, the next step in the setup is to connect it to the Internet.
Then it can download any updates that may be available.
You must decide whether to connect your Android TV box to Wi-Fi or via an Ethernet cable.
In general, Ethernet will give you a faster, more consistent speed. Wi-Fi will be slower, but you don’t need your router next to your television.
Tip #4: If you happen to have your house wired for Ethernet and there’s a port near your TV, I recommend connecting via Ethernet.
Connect Via Ethernet
Connecting via Ethernet is by far the easier option.
Ethernet is a wired connection directly to your cable modem or router. An Ethernet connection is more stable than Wi-Fi, especially when you stream content or games.
I haven’t seen any Android TV boxes come with an Ethernet cable. You’ll need to buy one if you don’t have an extra lying around the house.
This is another case where you don’t need to buy more than the basics.
Ethernet is rated in categories (Cat 5, Cat 6, etc.). Big businesses that connect hundreds of computers to the same network will need cables with higher throughput. In your house, Cat 5 is perfectly fine.
There is one exception to that rule, however.
Personally, I love the ultra-thin flat ribbon Ethernet cables. In my house, there are some places where I have to run the cables along the walls to hide them. The flat wires make that so much easier.
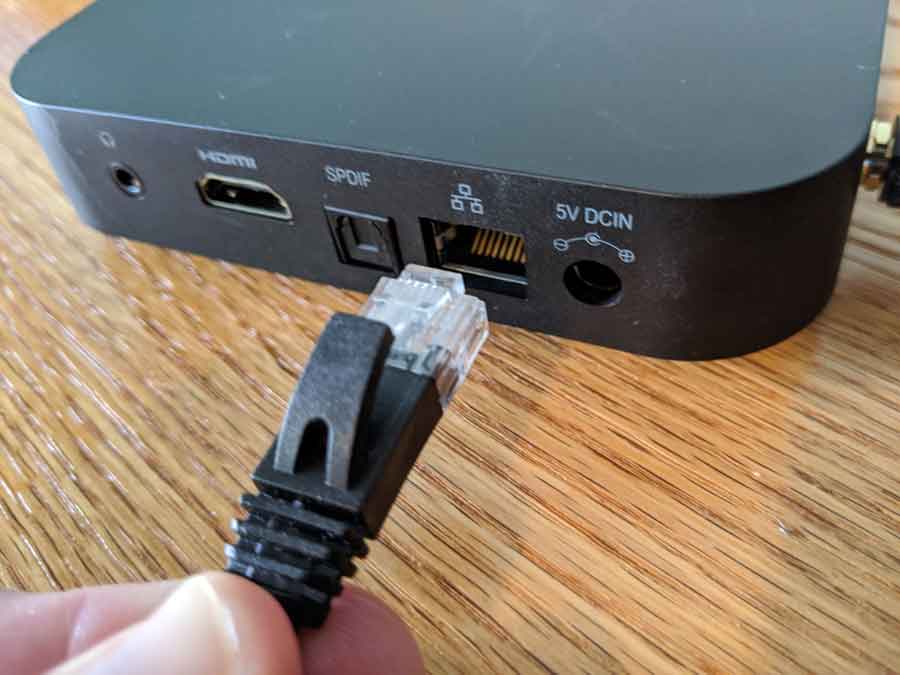
On the back of every Android box, you’ll see a port that looks like a large telephone port. It may be labeled RJ-45, Ethernet or have an icon like the image below.
Step 5: Plug one end of your Ethernet cable into this port.
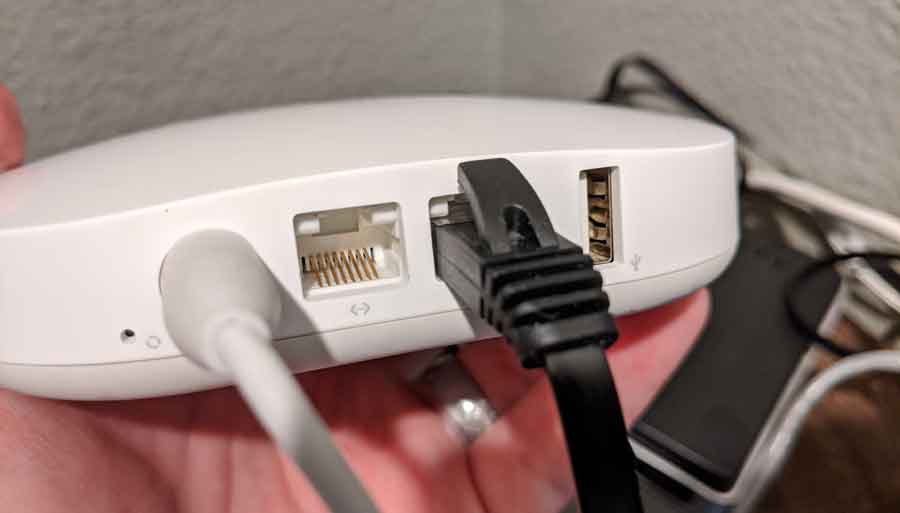
The other end of the plug will go directly into your router, as you see in this next image, or into the Ethernet port in your wall if your house is hardwired.
Remember…this isn’t the same as a telephone jack, so it won’t fit in that plug.
Connecting Via Wi-Fi
Some initial setup routines will walk you through how to connect your Android TV box to your Wi-Fi network. Most won’t, however.
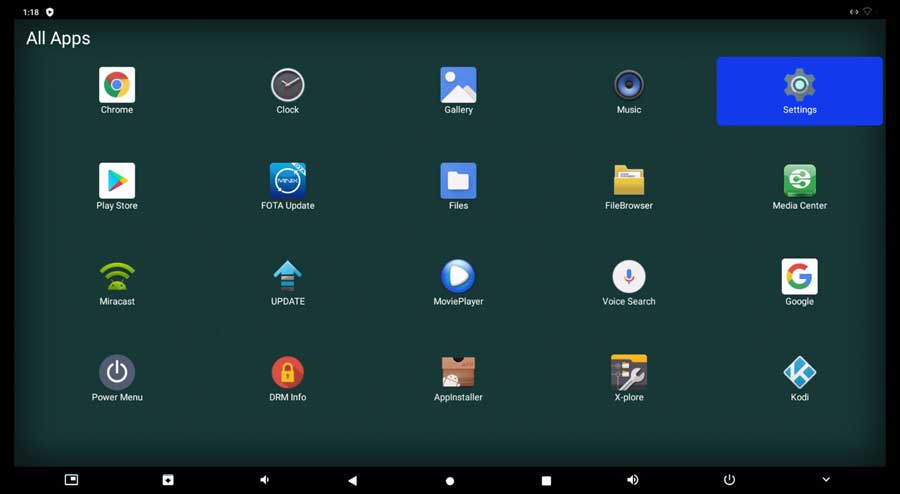
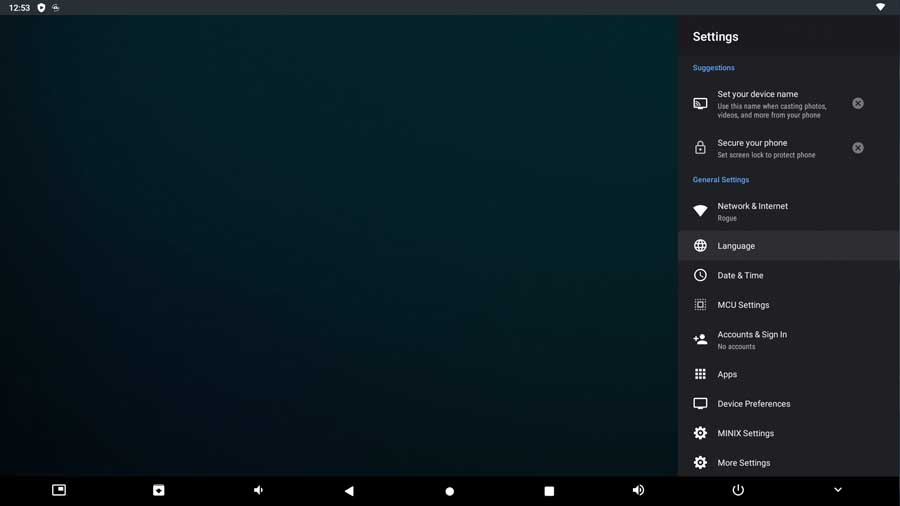
If your device doesn’t take you through the process, you’ll want to click on the Settings menu. This is slightly different on each device.
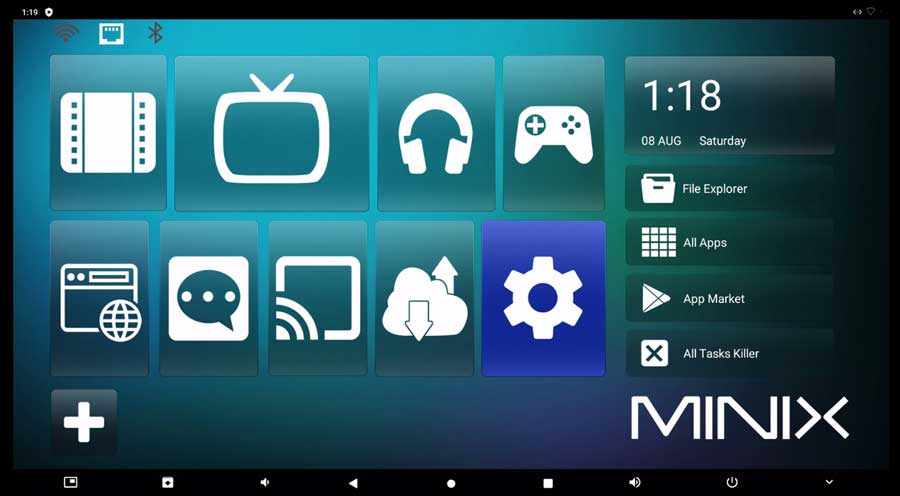
Here are the most common methods to get to the menu that you see in the image below:
- Click on the large icon shaped like a gear on your main home screen.
- Look for an icon labeled Settings, even if it does not have an image of a gear.
- Click on the All Apps button to launch the App Drawer. Scroll down until you see the Settings app icon.
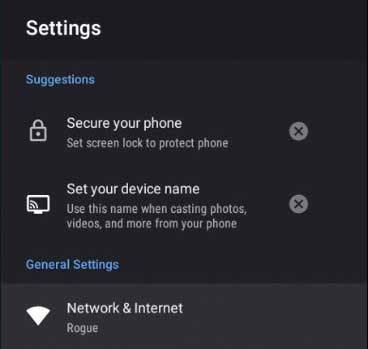
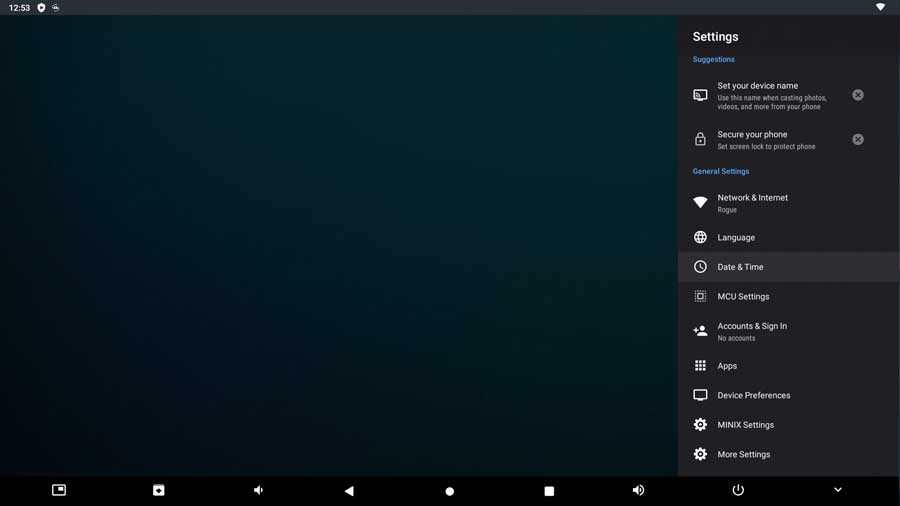
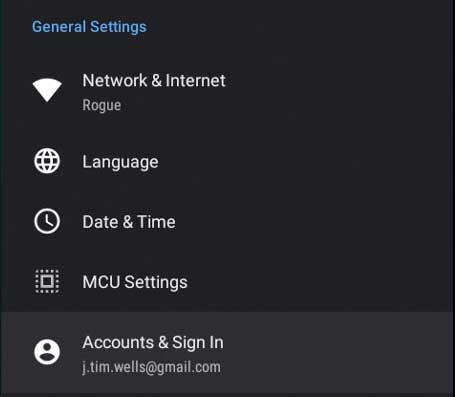
Once you’re in the Settings menu, scroll down to the Network & Internet section.
Here you’ll be able to quickly tell if (and how) your device is connected without going into the menu.
In this case, you can see that there is No Network Connected. That means we have to manually connect to the network.
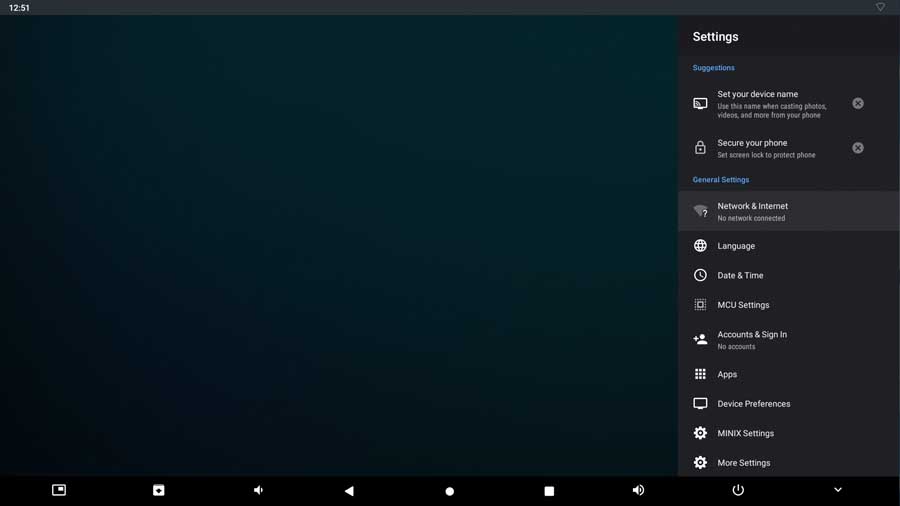
Step 6: Click on Network & Internet
From here, the menu will change to show any wireless networks within range on the upper half of the screen.
You should see it on this list as long as your router is within range.
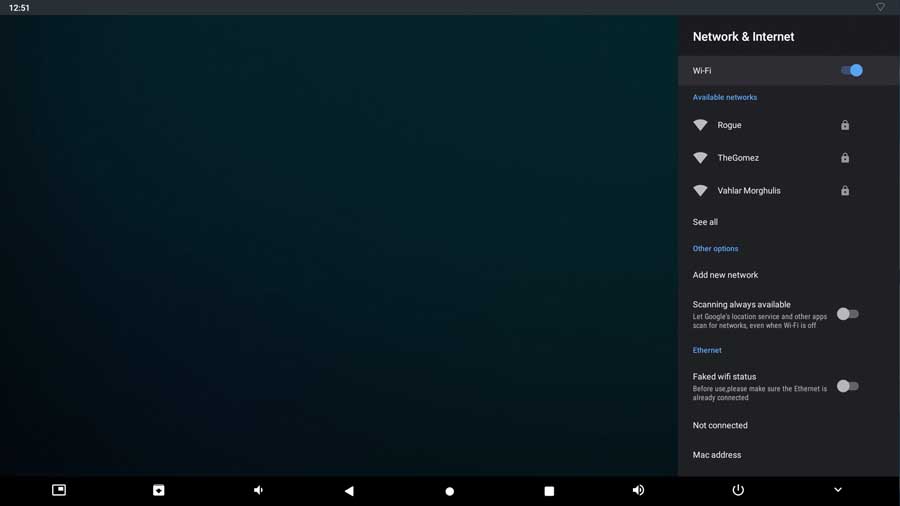
My network is named Rogue.
Yours will, of course, be different.
Step 7: Click on the network you wish to join.
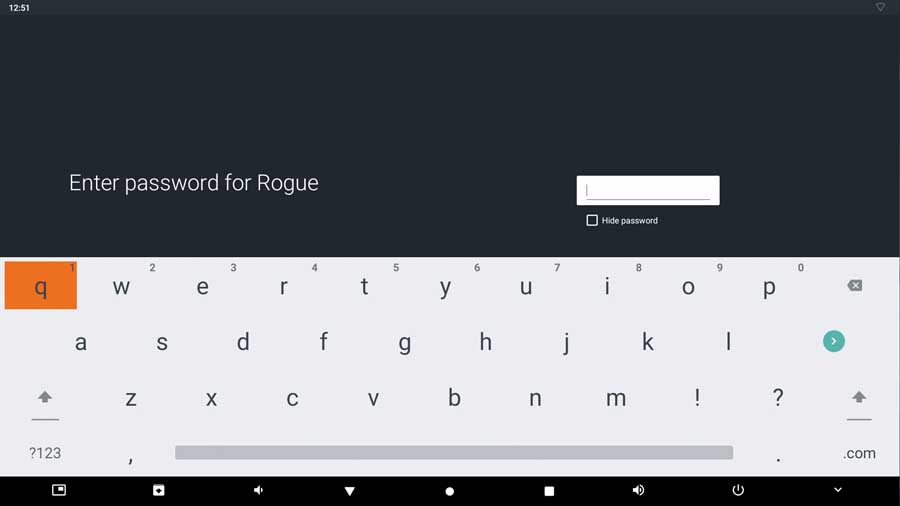
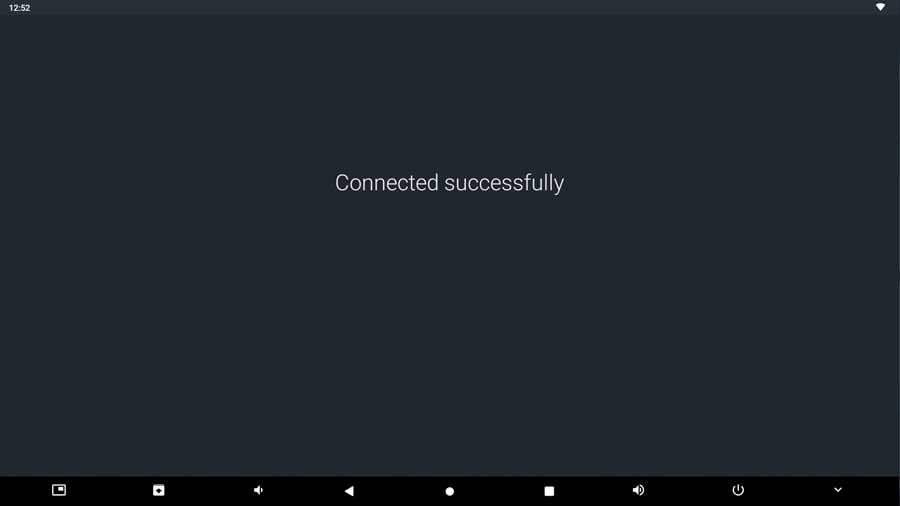
Step 8: Enter your username and password for the network.
Once you’ve entered your network credentials, your Android TV box will attempt to connect to your Wi-Fi network.
As long as you’ve typed the information correctly, you should get the Connected Successfully message you see below.
Verify Your Connection
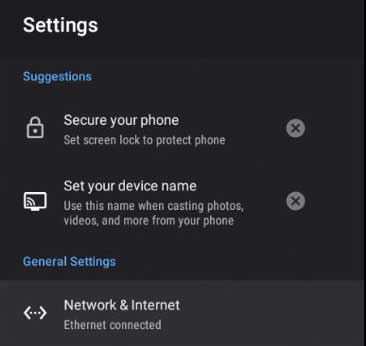
Once you’ve set up your network, verify that you’re connected. This process is the same whether you are connected through Wi-Fi or Ethernet.
Step 9: Go back to the Settings menu. Directly underneath the Network & Internet menu, you should see the name of your wireless network or “Ethernet Connected.”
Change Language
Directly underneath the Network & Internet section of the Settings menu is the Language settings.
Usually, the default language will be set to English (US).
You can change this to a different language or regional version of English if you live in the UK, Canada, or Australia.
Step 10: Click on the Language menu
Step 11: Scroll through the menu until you find your desired language and dialect.
Click on it to highlight it.

Step 12: Click back to the main Settings menu.
Change the Date, Time or Time Zone
By default, Android devices are set to use GMT (Greenwich Mean Time).
That’s great if you live in the UK or a few other countries. Most of us will need to change the time zone.
Step 13: Click on the Date & Time section of the Settings menu.
The default setting is to automatically use the network-provided time. That keeps your network time current, but you must manually adjust the time zone.
Step 14: Click Set Time Zone
Step 15: Scroll through the different time zones until you find the one applicable to your home.
Click on it to select it and return to the Date & Time menu.
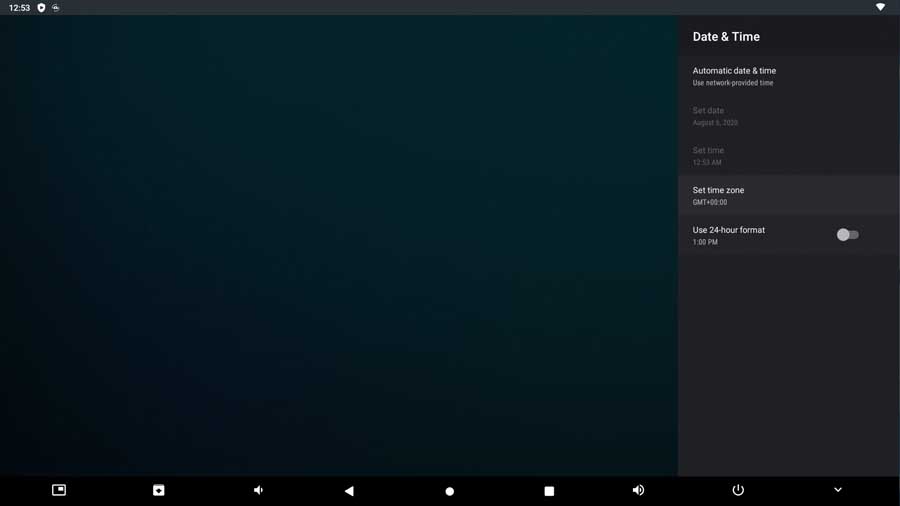
Step 16 (optional): If you don’t like the 24-hour time format, you can disable that on this menu as well.
Adding Your Google Account
Adding your Google account information makes updating apps through the Google Play Store quick and easy. Automatic, in fact.
This could be a problem for people who don’t have a Google account or who don’t want to give personal information to Google.
Certain devices, like the NVIDIA Shield TV, force you to sign in with a Google account. They won’t let you can finish the setup without one.
I’ve found a great workaround, though. If privacy is a big concern for you, check out my article on how to use Android TV without a Google account.
Step 17: Click Accounts & Sign In
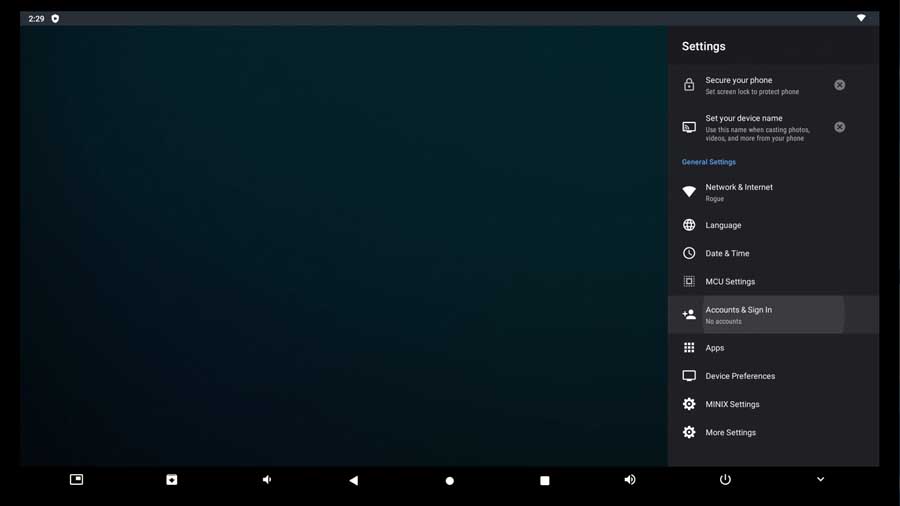
Your Android TV box will then look to see if you’ve got an active Google sign-in on the device so it can help set up your account faster.
If you don’t already have an account, it’ll ask you to enter your Google account email address and password.
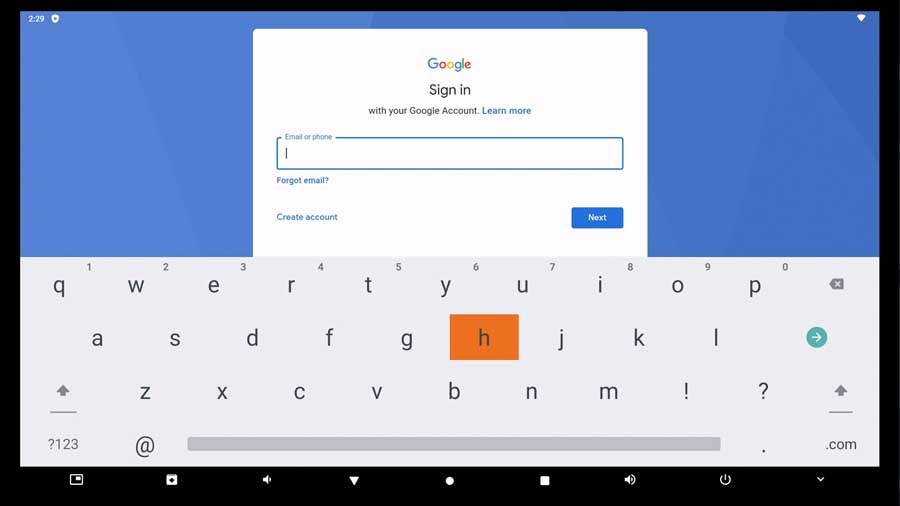
Step 18: Enter your Google account name
If you have an Android phone, Google has simplified the setup process. You can complete the sign-in process on your phone.
That means your new Android TV box has access to your phone, and you’ll never have to type in your password again!
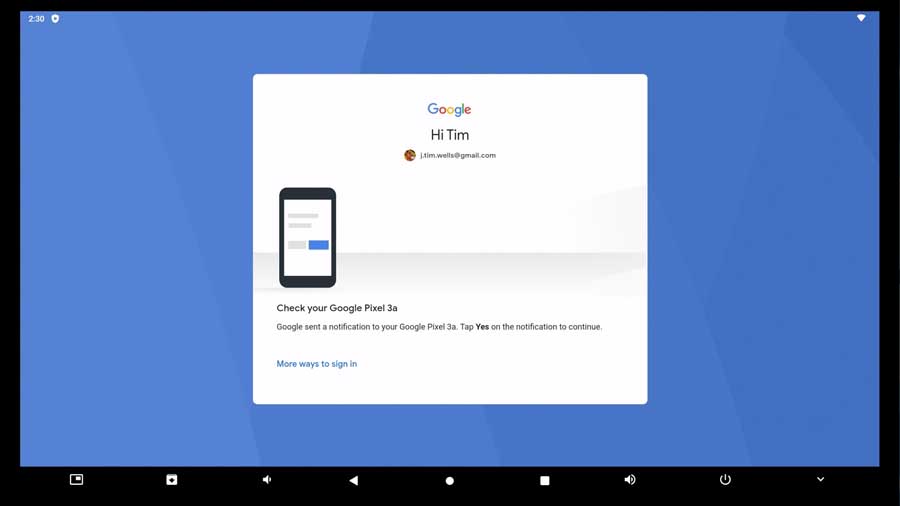
Step 19: Enter your password or complete the sign-in process on your mobile phone.
After you read through the terms and conditions, you can back up your account to your Google Drive storage.
This may be a good idea, depending on how you use your device. I wasn’t planning on storing anything critical on my Android TV box, so I didn’t set it up.
Step 20 (optional): Enable backup to Google Drive
Once you’re finished, your Google account name will appear under the Accounts & Sign In heading of the Settings menu.
Update Your Device
Now that the initial setup process on your new Android TV box is finished, you first want to make sure it’s updated and running the latest firmware.
This is going to be slightly different for each manufacturer.
Many brands will have OTA (Over The Air) update apps available for their devices. They will make the updating process MUCH easier, so it’s worth checking on that first.
Step 21: Open the App Drawer (also known as All Apps)
An Over The Air Update app can have several names, depending on the manufacturer.
For example, on this Minix Android TV box, it’s listed as FOTA Update.
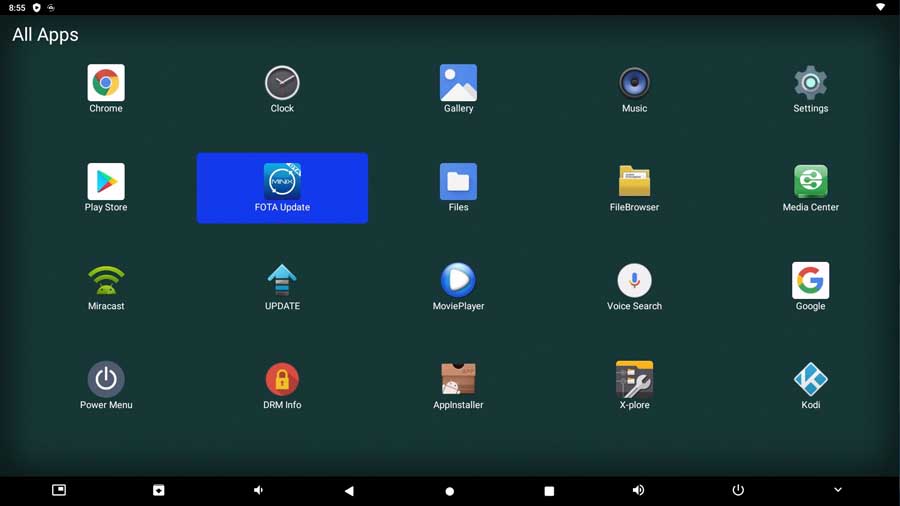
Step 22: If you find an OTA update app on your device, follow the on-screen prompts to update your device. You may have to repeat the process several times if there are multiple updates available.
Step 23: You may need to do some digging if you do not find an OTA update app on your device.
I created a massive Android TV Box Firmware Guide to help point you in the right direction. It has links to over 30 different manufacturers to find the correct firmware for your device.
Install Aptoide TV App Store [Google Play Store Alternative]
The Google Play Store is a great app store, but there aren’t a lot of apps that work well on Android TV boxes.
Most apps are designed for tablets or phones. They don’t translate well to your television.
That’s where the Aptoide TV App Store comes in.
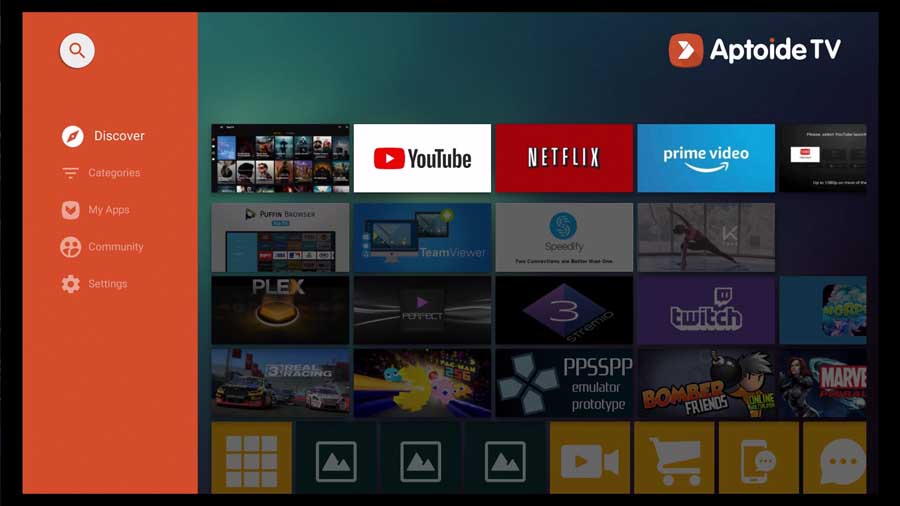
Aptoide TV is a third-party alternative app store, which means Google doesn’t own it.
There you can find thousands of apps you couldn’t get otherwise. This includes web browsers and streaming apps to help enhance your experience.
Each is specifically designed for your TV, so you know they’ll look great.
Installing the Aptoide TV app store is more involved than we can get into here. I created a handy step-by-step guide to walk you through the process.
It only takes about five minutes to install. Don’t skip this step! It’ll ensure you get the most out of your Android TV box!
How to Tell the Difference Between Android vs. Android TV Boxes
There are some differences between a streaming media player or television running the official Android TV and an Android TV box running the stock Android operating system.
It’s important to be able to tell the difference between the two.
Several manufacturers bundle custom launchers with their TV boxes to make it a better experience.
Android wasn’t designed to work on televisions. It was intended to be on phones and tablets, so some things don’t translate as well.
In general, here’s how to tell if you have an official Android TV device or a TV box running Android OS.
If you still have questions, I cover the differences between pure Android and Android TV in this article.
Android TV
The official Android TV launcher will look like this, with few differences between manufacturers.
On the left-hand side, you’ll see a row of categories such as Apps, Google Play Music, Play Movies & TV, and a recommendations row that varies depending on what’s popular at the time.
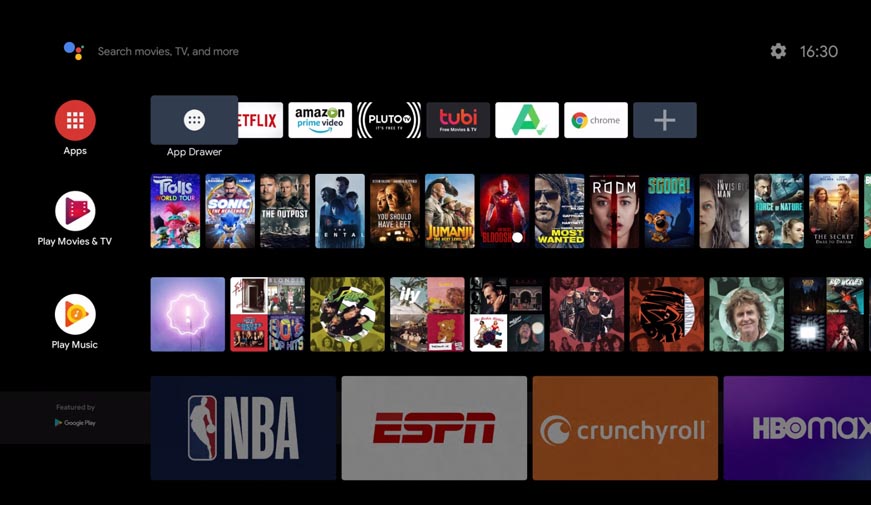
At the top of the screen will be a search field for Google Assistant on the left-hand side of the screen. You’ll see a Settings icon and the current time on the upper right-hand side.
Your device may have the newer Google TV interface. Although they’re both the same underneath the hood, Google TV is easier to navigate with its menu bar at the top of the screen.

If this looks like what you see on your TV screen, don’t worry. The process is actually easier for official Android TV’s.
Android OS
By contrast, there are dozens of different launchers available for Android to give it a different look and feel.
As you can see in this image, most launchers have large icons that take up most of the screen.
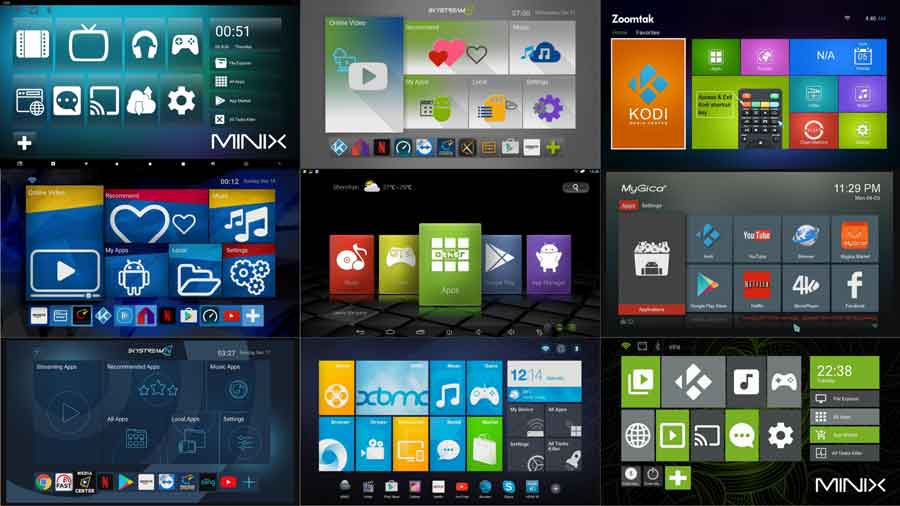
These are nine different Android launchers from various manufacturers. As you can see, there is a lot of variability in their appearance.
But the common thread is that each has large icons for Movies, Kodi, Music, or Games that will pull up apps that fall into that category.
If you see something similar on your smart TV screen, skip to the Setting up an Android TV Box section below.
Wrapping It Up
Android TV boxes don’t have a user manual, so setting one up can be pretty confusing. This guide should help you quickly go through the process of programming your TV box so you can get up and running fast.
The next step is to start adding some apps. Check out my list of the best Android TV apps you must have on your device!

After a brief hiatus from the industry he's back at the helm of AndroidTVNews.com to bring Android TV and TV boxes to the forefront of the streaming world.
When he's not writing, he spends as much time as he can with his beautiful wife and his bulldog.
- How to Install Kodi Diggz Xenon Plus & Free99 Build [March 2024] - March 3, 2024
- How to Enable Unknown Sources on Chromecast with Google TV [2024] - October 30, 2023
- How to Install the Seren Kodi Addon [2024] - October 29, 2023